This creamy and luxurious vegan rice pudding is made with coconut milk and is gluten-free. I love to top my vegan coconut rice pudding with fresh fruit for a delicious dessert but you can customise it to suit the season!

- Coconut Milk Rice Pudding Recipe Ingredients
- Method
- Toppings
- Storage
- Other Vegan Desserts
This dairy-free rice pudding is just as creamy as the regular milk version. This vegan version uses full-fat coconut milk and only a couple more main ingredients.
Other rice pudding recipes we love are this Rice Kheer .
This creamy vegan rice pudding recipe combines the tropical twist of coconut milk resulting in the best vegan rice pudding recipes you’ve ever tasted.
To prepare this delightful dessert, start by simmering rice in a mix of coconut milk and vegan milk on the stovetop over low heat.
The magic happens as the rice soaks up the goodness of coconut flavor, creating a luscious and creamy coconut rice pudding.
Lucky for those with a sweet tooth, different types of sugar all work – brown sugar, cane sugar, agave nectar, or even chocolate chips to enhance the sweetness.
Other coconut recipes you might like are 3 ingredient coconut truffles , coconut syrup and mango coconut pancakes .

Coconut Milk Rice Pudding Recipe Ingredients
Main ingredients are easily available in your local grocery store.
Rice – I used pudding rice known as short-grain rice for this recipe as they are more starchy.
Coconut milk – full fat tinned coconut milk is best but light coconut milk can be used too. We like to use coconut milk in this Coconut Milk Coffee too.
Non-dairy milk – I used almond milk as you will need extra liquid to cook the pudding but any dairy-free milk can work here such as soy milk, oat milk, almond milk or cashew milk.
Sugar – To sweeten up this pudding I have used regular vegan granulated white sugar. You can use coconut sugar, maple syrup, agave syrup, coconut nectar or brown rice syrup. If not vegan, use honey. All of these options will work well for this recipe too. Vegan condensed milk works too.
Flavor – vanilla extract or vanilla bean paste.
Coconut – I have added lightly toasted coconut flakes in to the rice pudding and garnish it, but you can toast it darker or totally leave it.

Method
Lightly dry toast coconut flakes in a frying pan, until light pink. Remove and set a side for later use.
Take a heavy bottom pan, rinse it with clean water to prevent the milk burning and sticking.
Pour coconut milk and almond milk in a pan, bring it to a gentle boil on medium heat.
Add the rice and vanilla and mix well.
Let it boil for 5-7 minutes uncovered, then lowered down the heat and let it simmer for 18-20 minutes or until the rice is cooked and the pudding becomes thick.
Keep checking and stirring every few minutes so it doesn’t stick to the pan.


Add sugar or whichever sweetener you are using.
Mix well, cook another 5-7 minutes, at this time do not cook rice pudding covered and stir almost constantly.
Now add toasted coconut, if using then turn off the heat.
Let the pudding sit for a while, at this stage, it will go very creamy.
If you want to serve warm, serve after five to ten minutes, top it up with the berries, and remaining toasted coconut.


Toppings
Feel free to customize the dessert with your favorite toppings, like golden raisins or strawberry sauce.
Mango or pineapple pieces will work wonders with coconut flavour.
You can also try swirling in chocolate chips, and your favorite chopped nuts – I think hazelnuts would go great in chocolate rice pudding!
Storage
Store leftover coconut rice pudding in an airtight container. Once it cools to room temperature, place in the fridge and eat within 2 days. It can be served warm or chilled.

Other Vegan Desserts
Basque Cheesecake
As always if you make this recipe, be sure to leave me a comment, rate this recipe and tag me on Instagram @jcookingodyssey or #jcookingodyssey. I love seeing all your photos of my recipe recreations!
Don’t forget to follow me on social media using the buttons below – I can’t wait to see you all there!
- YouTube

Coconut Rice Pudding with Coconut Milk (Vegan)
Equipment
- 1 pan
Ingredients
- 1 can coconut milk full fat (400ml)
- 1 ½ cup non-dairy milk almond milk
- ½ cup rice
- ⅓ cup sugar
- 3 tablespoon coconut flakes lightly toasted
- 1 teaspoon vanilla extract
Topping
- 1 cup berries
Instructions
- Lightly dry toast coconut flakes in a frying pan, until light pink. Remove and set a side for later use.
- Take a heavy bottom pan, rinse it with clean water to prevent the milk burning and sticking.
- Pour coconut milk and almond milk in a pan, bring it to a gentle boil on medium heat.
- Add the rice and vanilla and mix well.
- Let it boil for 5-7 minutes uncovered, then lowered down the heat and let it simmer for 18-20 minutes or until the rice is cooked and the pudding becomes thick.
- Keep checking and stirring every few minutes so it doesn’t stick to the pan.
- Add sugar or whichever sweetener you are using.
- Mix well, cook another 5-7 minutes, at this time do not cook rice pudding covered and stir almost constantly.
- Now add toasted coconut, if using then turn off the heat.
- Let the pudding sit for a while, at this stage, it will go very creamy.
- If you want to serve warm, serve after five to ten minutes, top it up with the berries, and remaining toasted coconut.
Notes
Nutrition
PLEASE NOTE: Nutritional values are estimated by a computer and may vary based on ingredients and portion sizes. For personalised dietary advice, please consult a qualified healthcare professional.
Note:- This post was originally posted on 2nd May 2019 but I have updated the post since with helpful content. The recipe remains the same.
Coconut Rice Pudding with Coconut Milk (Vegan)
Equipment
- 1 pan
Ingredients
- 1 can coconut milk full fat (400ml)
- 1 ½ cup non-dairy milk almond milk
- ½ cup rice
- ⅓ cup sugar
- 3 tablespoon coconut flakes lightly toasted
- 1 teaspoon vanilla extract
Topping
- 1 cup berries
Instructions
- Lightly dry toast coconut flakes in a frying pan, until light pink. Remove and set a side for later use.
- Take a heavy bottom pan, rinse it with clean water to prevent the milk burning and sticking.
- Pour coconut milk and almond milk in a pan, bring it to a gentle boil on medium heat.
- Add the rice and vanilla and mix well.
- Let it boil for 5-7 minutes uncovered, then lowered down the heat and let it simmer for 18-20 minutes or until the rice is cooked and the pudding becomes thick.
- Keep checking and stirring every few minutes so it doesn’t stick to the pan.
- Add sugar or whichever sweetener you are using.
- Mix well, cook another 5-7 minutes, at this time do not cook rice pudding covered and stir almost constantly.
- Now add toasted coconut, if using then turn off the heat.
- Let the pudding sit for a while, at this stage, it will go very creamy.
- If you want to serve warm, serve after five to ten minutes, top it up with the berries, and remaining toasted coconut.
Notes
Nutrition
PLEASE NOTE: Nutritional values are estimated by a computer and may vary based on ingredients and portion sizes. For personalised dietary advice, please consult a qualified healthcare professional.
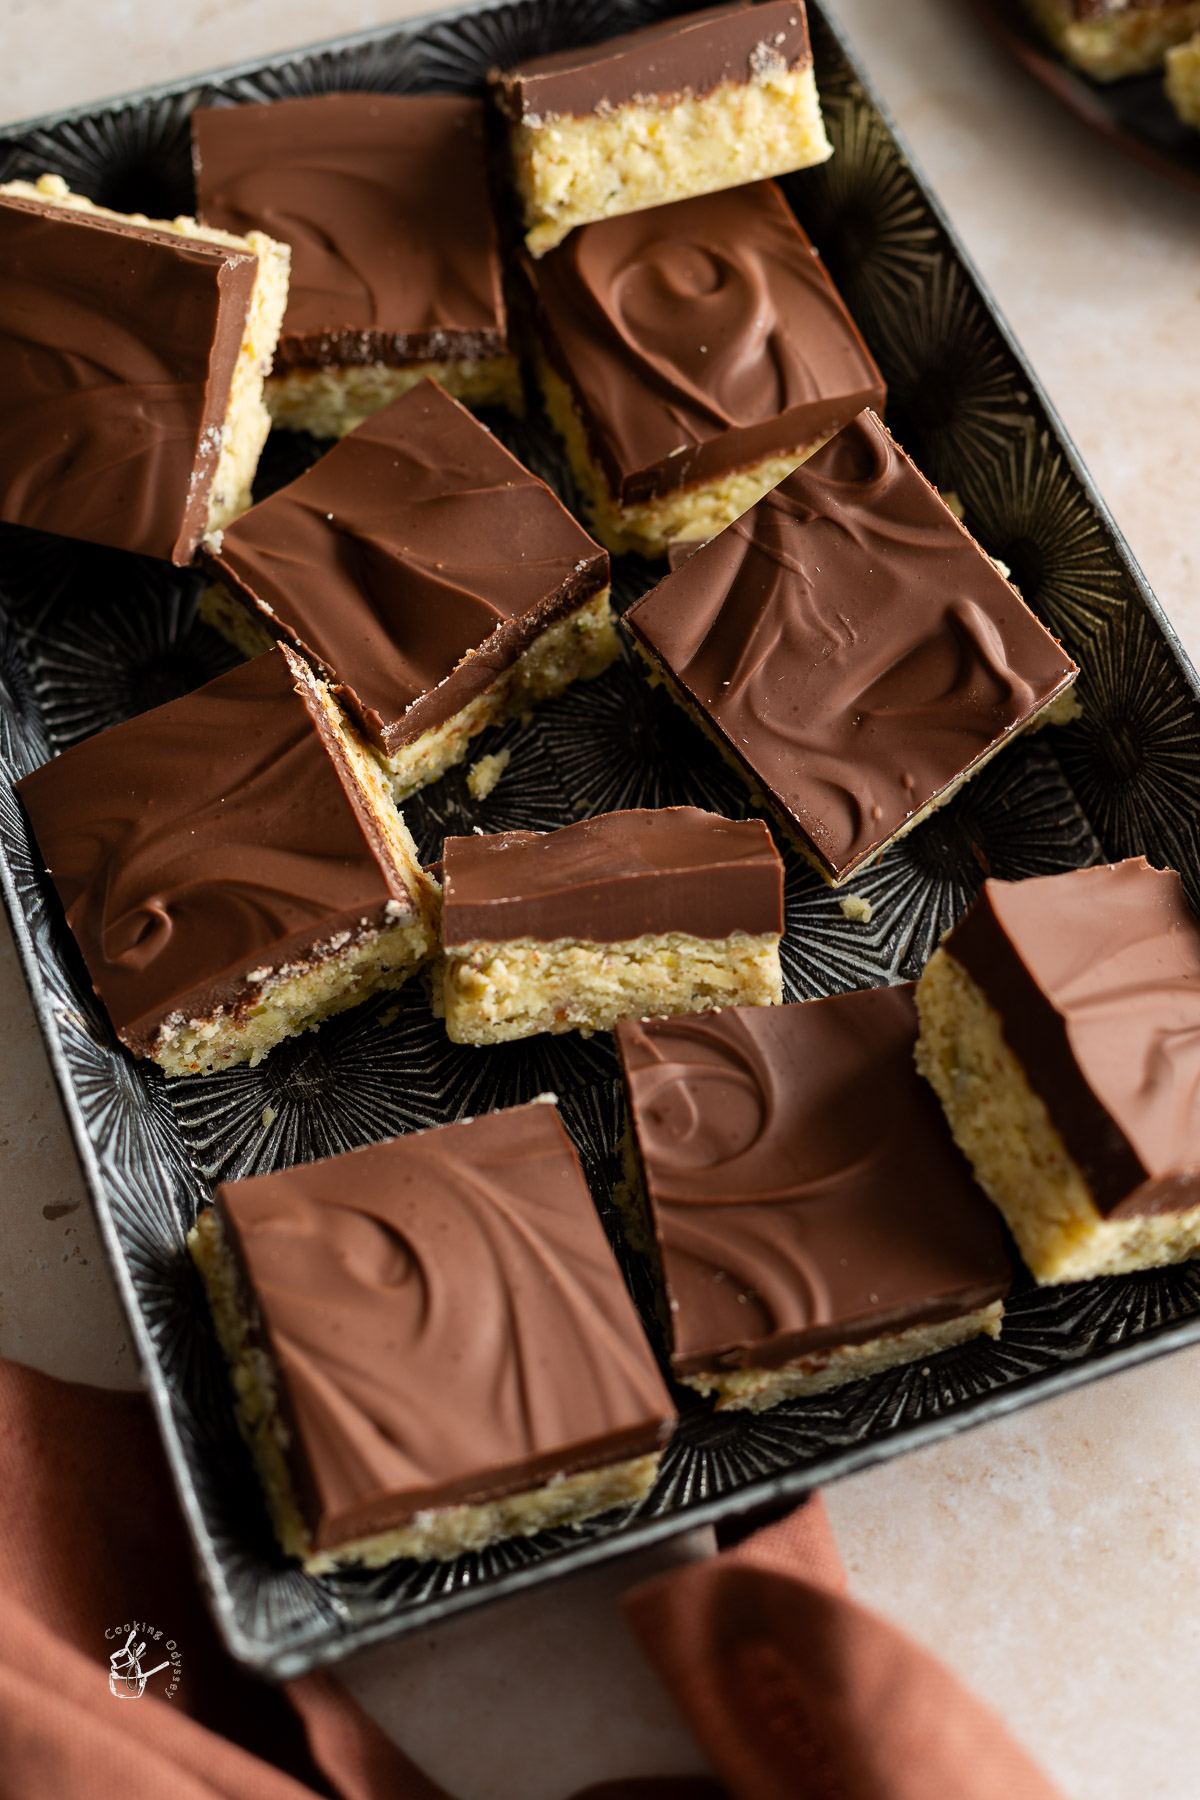
The classic Indian sweet shop mithai, Chocolate Barfi recipe, is prepared with a creamy plain milk barfi layer topped with smooth milk chocolate. It’s the perfect Indian dessert for gifting or special occasions. Make this easy recipe at home!
- 2 Layer Chocolate Burfi Ingredients
- Equipment
- How to make chocolate milk burfi
- Easy Chocolate Burfi Tips
- Storage
- Other Indian Sweets Recipe
Growing up, chocolate barfi was my favourite indian sweet mithai! It was so exciting visiting the mithai shops and seeing rows of indian mithais – it was hard not to buy the whole shop!
Luckily, my Mum made the best ever chocolate barfi at home so it could be enjoyed at any time!
This chocolate burfi recipe uses the classic white barfi or milk powder burfi which is perfectly crumbly. It is an easy recipe using simple ingredients and resembles the exact texture you can find in sweet shops (kandoi). The traditional recipe uses fresh mawa, or milk solids, but most Indian homes use milk powder.
The slight variation to my barfi recipe is to roast the milk powder first – this prevents the barfi going chewy as it doesn’t need much cooking. I also add powdered nuts which add to the crumbliness.
The top layer of this delicious chocolate burfi is a smooth milk chocolate. The chocolate flavor is irresistible with the milk barfi.
For a version using cocoa powder, you may like this Chocolate, Caramel and Vanilla Barfi . I’ve also used nutella to make Nutella Barfi and it tastes a bit like Indian chocolate fudge.
It is a delicious treat that can be served on Raksha Bandhan, Holi, Janmashtami or Diwali!
You can discover a delightful fusion of traditional indian sweets at Indian Fusion Desserts . These Indian Milk Sweets are also perfect for the festive season!
Other Indian festival desserts include kaju katli and other popular burfis like coconut barfi
2 Layer Chocolate Burfi Ingredients
Ingredients can be found in any indian store and most supermarkets.
White barfi layer
Full cream milk powder aka instant milk powder
Whole milk – you must use full fat milk
Sugar – white granulated sugar
Crushed nuts – almond, cashew and pistachio
Ghee – I use homemade ghee always for my sweets
Cardamom powder
Chocolate layer
Milk chocolate – I used milk chocolate chips, you can use bars of chocolate too. Mix it up by using dark chocolate, white chocolate or even ruby chocolate!

Equipment
Nonstick pan
Prepared pan – either a greased plate (with vegetable oil or other flavourless oil), barfi tray or baking tray lined with parchment paper
Sharp knife
How to make chocolate milk burfi
In a large plate, mix together the ghee, a dash of milk and the dry milk powder and leave for 5-10 minutes.
Then, on low heat, roast the crumbly milk powder until you get a toasted aroma. The milk powder should not change in colour.
Now make a milk sugar syrup. In a heavy bottomed pan, heat the milk on medium heat, continuously stirring as you go.
Once it simmers, add in the sugar and cook on a low flame until the sugar dissolves and reaches a runny condensed milk consistency. This will take a couple of minutes.
Tip in the milk powder, stir the mixture and cook until it forms a single mass and pulls away from the sides of the pan.
Immediately transfer the barfi mixture into a lined barfi tray.
Allow it to cool a little before proceeding.


Meanwhile, heat chocolate in the microwave or using the bain marie technique.
Pour this melted chocolate over the top of the milk burfi mixture and smooth out.
You can optionally create a swirl pattern as well with the back of a spoon
Allow the barfi and chocolate to set then slice cleanly into square shapes or rectangular shapes.
Clean the knife in between slices.


Easy Chocolate Burfi Tips
You can optionally add flavourings such as rose water or kewra water but this will change the flavour of the traditional version.
Do not leave the chocolate barfi uncut overnight – the chocolate will harden a lot and it will become difficult to get clean slices. As soon as the chocolate is just hard, I recommend cutting then. If your chocolate has hardened quite a bit, wash your knife under hot water, wipe dry and try again – the heat will gently melt the chocolate.
You will probably need to wipe the knife in between slices.
You can find the video recipe for the white barfi in the corresponding post.
Save the crushed nuts and transform into Badam Milk Powder .
Storage
Chocolate barfi is best stored at room temperature in an airtight container. Keep in a cool place, away from direct sunlight as the chocolate can soften in warm weather.
I do not recommend freezing this particular barfi as the chocolate will not thaw properly – usually, barfi is freezer safe.

Other Indian Sweets Recipe
Penda Recipe with Kesar and Mawa
Mawa Gujiya (Ghughra)
Badam katli with Almond Flour
As always if you make this recipe, be sure to leave me a comment, rate this recipe and tag me on Instagram @jcookingodyssey or #jcookingodyssey. I love seeing all your photos of my recipe recreations!
Don’t forget to follow me on social media using the buttons below – I can’t wait to see you all there!
- YouTube

Chocolate Barfi (Burfi)
Equipment
- 1 heavy bottom pan
- 1 Lined baking tray/tin
Ingredients
- 4 cup milk powder full cream
- 2 ¼ cup whole milk
- 1 ⅓ cup sugar
- 2 tablespoon ghee
- ⅓ cup nuts finely chopped or crushed
- 2 ½ cup chocolate chips use less for a thinner layer
Instructions
Barfi layer
- In a large plate, mix together the ghee, 1/4 cup of milk and the dry milk powder and leave for 5-10 minutes.
- Then, on low heat, roast the crumbly milk powder until you get a toasted aroma. The milk powder should not change in colour.
- Now make a milk sugar syrup. In a heavy bottomed pan, heat the milk on medium heat, continuously stirring as you go.
- Once it simmers, add in the sugar and cook on a low flame until the sugar dissolves and reaches a runny condensed milk consistency. This will take a couple of minutes.
- Tip in the milk powder, stir the mixture and cook until it forms a single mass and pulls away from the sides of the pan.
- Immediately transfer the barfi mixture into a lined barfi tray.
- Allow it to cool a little before proceeding.
Milk chocolate layer
- Meanwhile, heat chocolate in the microwave or using the bain marie technique.
- Pour this melted chocolate over the top of the milk burfi mixture and smooth out.
- You can optionally create a swirl pattern as well with the back of a spoon
- Allow the barfi and chocolate to set then slice cleanly into square shapes or rectangular shapes.
- Clean the knife in between slices.
Video
Notes
Nutrition
PLEASE NOTE: Nutritional values are estimated by a computer and may vary based on ingredients and portion sizes. For personalised dietary advice, please consult a qualified healthcare professional.
Note:- This post was originally posted on 2nd of October 2010 but I have updated the post since with helpful content. The recipe remains the same.
