Make homemade coconut syrup with just 2 simple ingredients – coconut milk and sugar! Perfect addition to drinks or drizzling over pancakes. It’s naturally vegan and can even be used as a dairy-free condensed milk!

- Coconut Syrup Ingredients
- How to make Coconut Syrup – step by step instructions
- Pro Tips
- How to use coconut syrup
- Storage
This easy coconut syrup recipe is similar to the syrup served over waffles and pancakes in Hawaii and the recipe couldn’t get any simpler!
Simply heat coconut milk and sugar until thickened for a simple syrup with tropical flair. It comes together in around 10 minutes if making a small batch.
All ingredients are available at your local grocery store.
Use this delicious syrup in your favourite recipes for a burst of tropical flavor in all sorts of different ways. I love it over these 3 ingredient vegan waffles but also this Air Fryer Grilled Pineapple . It is also great in coconut milk coffee .

Coconut Syrup Ingredients
Coconut Milk – I like to use full fat coconut milk for rich coconut flavor.
I recommend using a good coconut milk brand for extra flavor. Don’t worry if the contents have separated into coconut cream and coconut water – as the mixture heats, it will dissolve.
Pure cane sugar – I have used white sugar to keep the syrup creamy white but you could also use coconut sugar or brown sugar.
Optional:
A drop of vanilla extract is a great way to add warm flavors.
How to make Coconut Syrup – step by step instructions
In a medium saucepan, whisk coconut milk and sugar then heat on medium heat. As it comes to a gentle boil, lower the heat and continue to cook until just thick and syrup-y.
It is important to continually stir to prevent the mixture burning and sticking to the pan
Remove from the heat when it thickens to your desired consistency but note that it thickens further as it cools. You’re aiming for a maple syrup consistency so it isn’t too thick.
For a thicker syrup similar to condensed milk, cook the mixture for longer.
Pour in a mason jar ready for use.


Pro Tips
Stick to a good brand of coconut milk and ensure it is well in date.
Note that this recipe requires tinned coconut milk which is thicker than the dairy free coconut milk that comes in bottles or cartons.
Do not substitute coconut extract in this recipe.
To speed up the process, you could add a quarter teaspoon of cornstarch to 1 tin of coconut milk to thicken it quicker without needing to heat for too long.
To make vegan condensed milk, cook the mixture until it thickens further.
How to use coconut syrup
Add it to a cold drink such as a cold brew for amazing taste or to warm coconut lattes. It is also great in cocktails or mocktails.
Top on air fryer french toast sticks or your favorite pancakes with fresh fruit for next level fun flavor! I love it on these Mango and Coconut Pancakes !
It is also brilliant with these Buckwheat Banana Pancakes – just add some chopped macadamia nuts and almonds.
Drizzle it over vegan ice cream or sorbet with extra toasted coconut flakes
Use it in replacement of sweet condensed milk to make so many Indian sweets! Use in these coconut ladoo to make them vegan!
Storage
Store leftover syrup in an airtight container and keep in the refrigerator for up to 1 week.
As it is a homemade syrup, it may not last as long as store bought versions which often contain preservatives.
It becomes thick once refrigerated, so leave it out at room temperature before using or heat gently.
Do not freeze coconut syrup as it looses texture upon thawing.

As always if you make this recipe, be sure to leave me a comment, rate this recipe and tag me on Instagram @jcookingodyssey or #jcookingodyssey. I love seeing all your photos of my recipe recreations!
Don’t forget to follow me on social media using the buttons below – I can’t wait to see you all there!
- YouTube

Coconut Syrup
Equipment
- 1 Saucepan
- 1 Spatula
Ingredients
- 400 millilitres coconut milk full fat, tinned
- 3 tablespoon sugar
Instructions
- In a medium saucepan, whisk coconut milk and sugar then heat on medium heat.
- As it comes to a gentle boil, lower the heat and continue to cook until just thick and syrup-y.
- Remove from the heat when it thickens to your desired consistency but note that it thickens further as it cools. You’re aiming for a maple syrup consistency so it isn’t too thick.
- For a thicker syrup similar to condensed milk, cook the mixture for longer.
- Pour in a mason jar ready for use.
Video
Notes
Nutrition
PLEASE NOTE: Nutritional values are estimated by a computer and may vary based on ingredients and portion sizes. For personalised dietary advice, please consult a qualified healthcare professional.
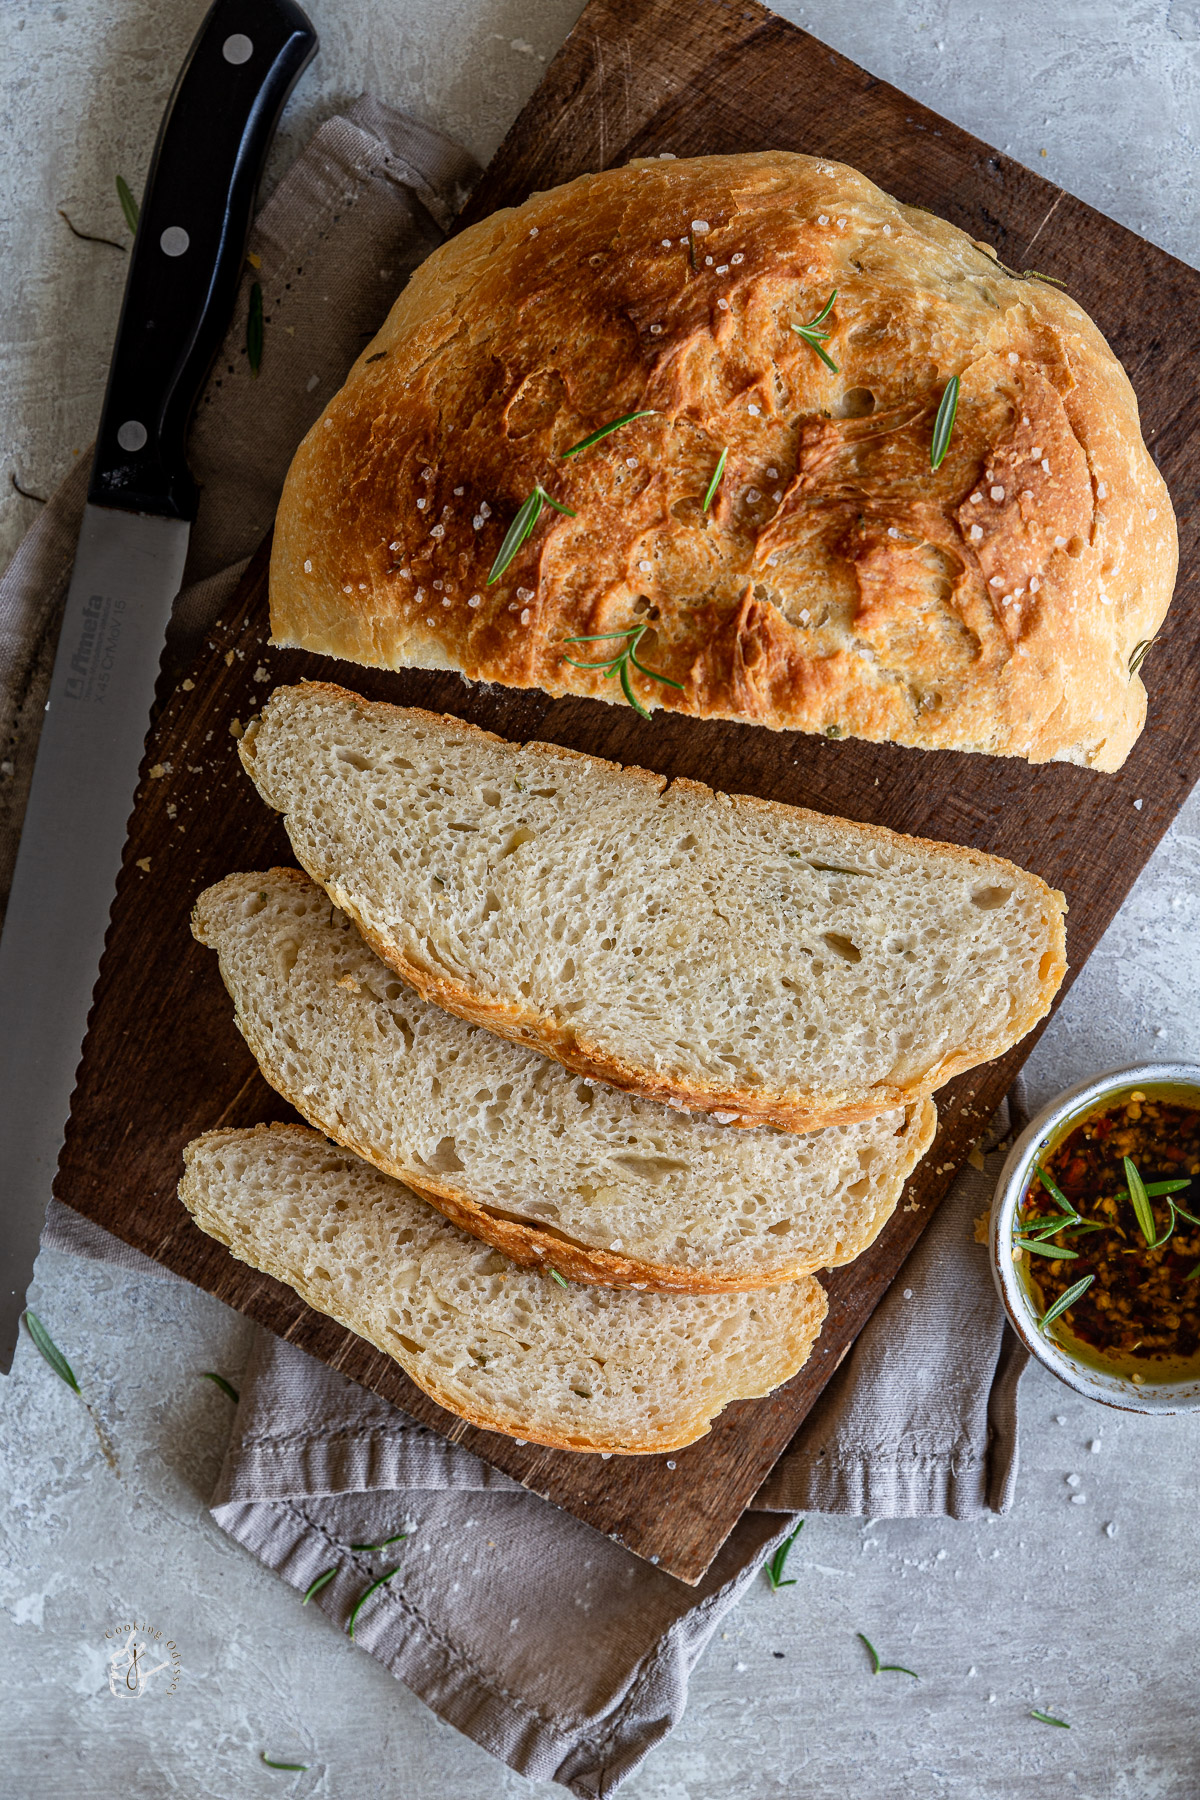
This no knead Instant Pot Bread recipe will give you perfect results every time! It’s flavoured with fragrant rosemary and fruity extra virgin olive oil and has a delicious crust and pillow soft crumb.
Perfect with this Olive Oil Bread Dip .
- Why you will love this recipe
- Instant Pot Bread Ingredients
- Equipment
- Instant Pot Bread Pro Tips
- How to make Instant Pot Bread Proofing stage Baking
- Instant Pot No Knead Bread Serving Suggestion
- Storage
- Other Bread Recipes
This pressure cooker bread recipe with olive oil and rosemary has the perfect golden-brown crust. It is moreish, addictive and will quickly become your favourite homemade bread!
This Instant Pot no knead bread is a game changer! Typically, no knead bread needs 12-18 hours to rise but thanks to the Instant Pot yogurt setting, you can proof the bread dough in just 3 hours! It works with other electric pressure cooker too
The function provides the perfect environment thanks to its low consistent heat.
I use the same Instant Pot proving technique to make Tiger Bread and Eggless Mandazi (east african coconut doughnuts)
I now have the newer model of the Instant Pot, which has its own “ Proofing ” method. It works even faster than the yogurt mode, so I had this quick bread proved in 60 minutes time instead!

Why you will love this recipe
Easy bread recipe that has the same quality as artisan bread
Made with simple ingredients easily available at your local grocery store
Takes a fraction of the time compared with no knead bread that uses traditional methods
No knead that doesn’t require a stand mixer
Instant Pot Bread Ingredients
Bread flour – I used Marriage’s strong bread flour for this recipe. This recipe produces white bread
Olive oil – I used good quality extra virgin olive oil
Sugar – regular white sugar
Salt – plus optional sea salt for topping
Yeast – I have used fast action yeast (aka active dry yeast or instant yeast or quick rise yeast).
Water – you need luke-warm water for this recipe
Optional additions:
Rosemary – fresh rosemary is best
Equipment
Instant Pot Pressure Cooker
Dutch oven – I used a 4.7L or 5 qt. Baking in a dutch oven leads to a better crust – the dutch oven retains heat and traps any steam created. If you do not have a dutch oven, use a heavy pan that is oven safe and has a lid.
Parchment paper

Instant Pot Bread Pro Tips
- Bread flour has a higher protein content compared with all purpose flour so allows for more gluten to develop. This gluten allows for a better dough rise, this is especially important as this is a no knead bread (kneading usually helps develop gluten)
- Ensure the yeast is within date – I prefer to buy individual sachets as they star fresher for longer
- Too much salt prevents the yeast from working, so do not add more than what the recipe states
- Ensure to use lukewarm water rather than cold water to activate the yeast (around 40-45C or 105F. Do not use boiling or hot water as this can destroy the yeast.
- Add water until you get a shaggy dough. You may find that you have to add more or less water depending on the brand of your flour and the temperature of your room. Add water a spoon at a time to reach the perfect texture.
- Temperatures and baking times can vary depending on your oven and whether you choose to scale this recipe up or down.
How to make Instant Pot Bread
First prepare the yeast mixture. Although we are using a fast action yeast, I prefer to bloom it first for better results.
In a large bowl, add the lukewarm water, yeast and sugar. Give a quick stir and set aside for 5-10 minutes whilst the yeast becomes frothy.


Meanwhile, in a separate large mixing bowl, prepare the flour.
Add the bread flour, olive oil, rosemary and salt. Mix well.
Once the yeast is frothy, pour into the flour mixture. I like to pour it in a cup of water at a time until you get a wet shaggy dough. I ended up adding a further 1 tablespoon of water. Mix using a wooden spoon.


Proofing stage
Line the inner pot of the instant pot with a large piece of parchment paper. I like to grease or spray the parchment with cooking spray oil to prevent any sticking.
Place the dough ball into the inner pot and proove the dough.
You can select Proofing, Sous Vide or Yogurt button based on your instant pot model.
For yogurt function – proove for around 3-4 hours or until more than double in size. Cover with a glass lid
For Proofing – select 25 deg C or 80 F for 60 minutes or 1hr 30 minutes or until more than double in size. The Instant Pot Ultimate lid will ask you to close the lid. I find this is the perfect temperature for proving.


Once risen, remove the parchment and dough from the instant pot. Please note that our bread developed a slight crust in the picture above – this is due to time taken between filming the recipe. This should not happen to your dough.
On a fresh sheet of parchment, or same sheet, sprinkle from flour and shape the dough into a ball. There is no need to knead and careful not to disturb any air pockets
If using, top the bread with more rosemary and sprinkle over sea salt.
If you wish, you can use a sharp knife to score the bread
Cover the dough by folding over the ends of the parchment paper and place a clean towel over the top. Allow the dough to rise for a further 30 minutes. If you have a warm place, keep near.


Baking
Meanwhile, preheat the oven to Gas Mark 7 or 430 F or 220C. Place a dutch oven inside the oven to preheat.
Once the dough has rested for a further 30 minutes, remove the dutch oven carefully from the oven.
Place the dough and parchment carefully into the hot dutch oven and cover with a lid.
Bake the bread in the preheated oven for around 30 minutes, remove the lid then bake for a further 15-20 minutes or until golden brown. If you’re bread appears to be browning too fast, reduce to a low temperature.
Remove from the oven once done.
Allow it to cool slightly on a wire rack before slicing using a bread knife.


Instant Pot No Knead Bread Serving Suggestion
Fresh bread is perfect as it is with a bit of butter but it also pairs beautifully with so many recipes.
Top it with butter and this Instant Pot Strawberry Jam
It is the best bread to dip into hot soups such as this Instant Pot Vegan Bean Soup or Carrot, Ginger and Coconut Soup .
Storage
Store leftover bread in an airtight container or cover with aluminum foil or plastic wrap to prevent it going stale. Make sure you allow it to cool to room temperature before storing
Consume it by the next day.
You can freeze this bread – wrap well in foil and store in the freezer for 1 month. Allow to thaw at room temperature.

As always if you make this recipe, be sure to leave me a comment, rate this recipe and tag me on Instagram @jcookingodyssey or #jcookingodyssey. I love seeing all your photos of my recipe recreations!
Don’t forget to follow me on social media using the buttons below – I can’t wait to see you all there!
- YouTube
Other Bread Recipes
Buckwheat Soda Bread
Red Grape, Rosemary and Goat’s Cheese Focaccia
Sundried Tomato Bread

Instant Pot Bread
Equipment
- 1 Instant pot Pressure cooker
- 1 Dutch oven or oven safe pan with lid
- Parchment paper
Ingredients
- 3 cup strong white bread flour
- 1.5 teaspoon yeast
- ¼ cup extra virgin olive oil
- 1.5 cup warm water plus extra as required
- 1 teaspoon sugar
- 1 teaspoon salt
- 1 tablespoon rosemary fresh – half chopped into smaller pieces
Instructions
Prepare the Instant Pot bread dough
- First prepare the yeast mixture. Although we are using a fast action yeast, I prefer to bloom it first for better results.
- In a large bowl, add the lukewarm water, yeast and sugar. Give a quick stir and set aside for 5-10 minutes whilst the yeast becomes frothy.
- Meanwhile, in a separate large mixing bowl, prepare the flour.
- Add the bread flour, olive oil, rosemary and salt. Mix well.
- Once the yeast is frothy, pour into the flour mixture. I like to pour it in a cup of water at a time until you get a wet shaggy dough. I ended up adding a further 1 tablespoon of water. Mix using a wooden spoon
Proofing stage
- Line the inner pot of the instant pot with a large piece of parchment paper. I like to grease or spray the parchment with cooking spray oil to prevent any sticking.
- Place the dough ball into the inner pot and proove the dough.
- You can select Proofing, Sous Vide or Yogurt button based on your instant pot model.
- For yogurt function – proove for around 3-4 hours or until more than double in size. Cover with a glass lid
- For Proofing – select 25 deg C or 80 F for 60 min -1hr 30 minutes or until more than double in size. The Instant Pot Ultimate lid will ask you to close the lid. I find this is the perfect temperature for proving.
- Once risen, remove the parchment and dough from the instant pot.
- On a fresh sheet of parchment, or same sheet, sprinkle from flour and shape the dough into a ball. There is no need to knead and careful not to disturb any air pockets
- If using, top the bread with more rosemary and sprinkle over sea salt.
- If you wish, you can use a sharp knife to score the bread
- Cover the dough by folding over the ends of the parchment paper and place a clean towel over the top. Allow the dough to rise for a further 30 minutes. If you have a warm place, keep near.
Baking
- Meanwhile, preheat the oven to Gas Mark 7 or 430 F or 220C. Place a dutch oven inside the oven to preheat.
- Once the dough has rested for a further 30 minutes, remove the dutch oven carefully from the oven.
- Place the dough and parchment carefully into the hot dutch oven and cover with a lid.
- Bake the bread in the preheated oven for around 30 minutes, remove the lid then bake for a further 20 minutes or until golden brown. If you’re bread appears to be browning too fast, reduce to a low temperature
- Remove from the oven once done.
- Allow it to cool slightly before slicing using a bread knife.
Video
Notes
Nutrition
PLEASE NOTE: Nutritional values are estimated by a computer and may vary based on ingredients and portion sizes. For personalised dietary advice, please consult a qualified healthcare professional.
