Dudhi na Thepla are a Gujarati flatbread made with grated bottle gourd, whole wheat flour and basic spices.

Plain thepla are a staple in Gujarati cuisine and are much loved due to their versatility. Thepla can be served with a cup of tea for breakfast, with a shaak for lunch or dinner and are even easy to transport as they keep well.
There are many flavour variations too such as methi na thepla and oats jowar methi thepla.
In my family we enjoy theplas with either masala chai or adarak wali chai .
My Mum prepares these dudhi thepla in the summer when dudhi is in season. Grated dudhi adds a delicious flavour, texture and moistness to thepla.
Other dudhi recipes we make are dudhi muthiya , dudhi bateta nu shaak , dudhi khichdi and dudhi halwa .
Ingredients
Be sure to check out the full recipe and exact ingredient list below in the recipe card.
- Whole wheat atta aka chapati flour. You can also use this multigrain atta which combines 6 different grains.
- Dudhi – grated. Alternatively use grated courgette.
- Yogurt – any plain yogurt will work.
- Green chilli and ginger – crushed
- Spices – turmeric powder, red chilli powder, ajwain, sesame seeds.
- Coriander
- Besan
- Sugar (optional)
- Salt
- Oil – needed for the dough and to shallow fry the thepla.
Farali Dudhi Thepla
To make these suitable for Hindu fasting, use farali atta instead of whole wheat atta. Farali atta is easy to purchase from Indian grocery stores. Perfect for Navratri or for any vrat days.
Serve with farali potato bhaji or farali aloo .

Recipe Tips
These are my Mum’s tips for the best dudhi na thepla.
- Grate dudhi using a fine grater with small holes or extra fine food processor shredding plate. This helps to roll thepla without tearing in the middle and edges.
- We saute shredded dudhi in a pan for a couple of minutes before adding it to the flour, to remove extra moisture from it. Wilted dudhi helps to roll the dough better.
- If possible, knead the dough without water and add water as needed.
- Keep the ratio 2:1 of flour to dudhi.
- Besan helps to soak up the moisture from the lauki, and provides elasticity to the dough.
- The dough should be semi stiff and rested for at least 15 minutes before rolling.
- Thepla thickness should be on the thinner side, just a little thicker than traditional Gujarati rotli.
- Shallow fry theplas on a medium to high flame to keep them soft.
Serving Suggestion
Serve dudhi na thepla as they are with extra yogurt or cucumber raita or fruit raita on the side. Gujarati athanu such as keri no chundo or raiti gor keri athanu will also go wonderfully.
To make them a more filling meal, pair with sukhi bhaji , aloo tamatar or sev tameta nu shaak .
Storage
Store dudhi thepla in an airtight container. They will remain fresh at room temperature for 1 day but to store any longer they must be refrigerated.
Dudhi thepla can be frozen. Roll the dough into a circle then place in between layers of parchment paper. The thepla can be cooked on the tavi directly from frozen.

As always if you make this recipe, be sure to leave me a comment, rate this recipe and tag me on Instagram @jcookingodyssey or #jcookingodyssey. I love seeing all your photos of my recipe recreations!
Don’t forget to follow me on social media using the buttons below – I can’t wait to see you all there!
- YouTube

Dudhi Na Thepla (Lauki Thepla)
Equipment
- grater
- Rolling Pin
- Griddle
- Spatula
Ingredients
- 1 cup bottle gourd dudhi peeled and grated
- 2 cup wheat flour + for rolling
- 3 tablespoon besan
- 1 tablespoon green chilli paste
- 1 teaspoon ginger paste
- 1 tablespoon red chilli powder
- 1 teaspoon turmeric powder
- 1 teaspoon sugar optional
- 3 tablespoon oil for moin
- 3 tablespoon yogurt
- 1 tablespoon salt
- ½ teaspoon carom seeds ajwain
- 6 teaspoon oil to shallow fry
Instructions
- In a frying pan heat 1/2 teaspoon oil, add grated dudhi and saute for a couple of minutes without getting brown.
- In a big mixing bowl add besan and wheat flour, mix in sauteed dudhi.
- Next add turmeric, red chilli powder, ajwain, sesame seeds, coriander, salt, 3 tablespoon oil,chilli-ginger and sugar.
- Combine everything then add yogurt, bring everything together using your hands.
- First knead the dough without using water, but if you think water is needed, add a tablespoon of water at a time.
- Knead a semi-stiff but pliable dough, cover with clean kitchen towel and rest for 15 minutes.
- Take a few drops of oil in your palms and knead the dough for 30 seconds before dividing it in equal portions. Roll them into balls.
- Heat the tawa/griddle on medium heat.
- Dip one ball in dry wheat flour and place it on the rolling board.
- Roll it using rolling pin in a circular motion. If thepla sticks on the rolling board or pin use more dry flour.
- Thepla thickness should be just a little thicker than Gujarati rotli.
- Carefully place rolled dudhi thepla on heated tavi. Keep the heat on medium flame.
- Begin cooking them on one side; once tiny air bubbles start to form and puff up, flip them to the other side.
- Brush on some oil and gently press with your spatula to cook it evenly. Flip, add more oil, and press again, cook until both sides have light brown spots.
- Once done, flip once more, remove from the griddle.
Video
Notes
Nutrition
PLEASE NOTE: Nutritional values are estimated by a computer and may vary based on ingredients and portion sizes. For personalised dietary advice, please consult a qualified healthcare professional.
Note – This recipe has been updated from our recipe archives with a new, improved recipe, new images and content. First published in May 2016 .
Dudhi Na Thepla (Lauki Thepla)
Equipment
- grater
- Rolling Pin
- Griddle
- Spatula
Ingredients
- 1 cup bottle gourd dudhi peeled and grated
- 2 cup wheat flour + for rolling
- 3 tablespoon besan
- 1 tablespoon green chilli paste
- 1 teaspoon ginger paste
- 1 tablespoon red chilli powder
- 1 teaspoon turmeric powder
- 1 teaspoon sugar optional
- 3 tablespoon oil for moin
- 3 tablespoon yogurt
- 1 tablespoon salt
- ½ teaspoon carom seeds ajwain
- 6 teaspoon oil to shallow fry
Instructions
- In a frying pan heat 1/2 teaspoon oil, add grated dudhi and saute for a couple of minutes without getting brown.
- In a big mixing bowl add besan and wheat flour, mix in sauteed dudhi.
- Next add turmeric, red chilli powder, ajwain, sesame seeds, coriander, salt, 3 tablespoon oil,chilli-ginger and sugar.
- Combine everything then add yogurt, bring everything together using your hands.
- First knead the dough without using water, but if you think water is needed, add a tablespoon of water at a time.
- Knead a semi-stiff but pliable dough, cover with clean kitchen towel and rest for 15 minutes.
- Take a few drops of oil in your palms and knead the dough for 30 seconds before dividing it in equal portions. Roll them into balls.
- Heat the tawa/griddle on medium heat.
- Dip one ball in dry wheat flour and place it on the rolling board.
- Roll it using rolling pin in a circular motion. If thepla sticks on the rolling board or pin use more dry flour.
- Thepla thickness should be just a little thicker than Gujarati rotli.
- Carefully place rolled dudhi thepla on heated tavi. Keep the heat on medium flame.
- Begin cooking them on one side; once tiny air bubbles start to form and puff up, flip them to the other side.
- Brush on some oil and gently press with your spatula to cook it evenly. Flip, add more oil, and press again, cook until both sides have light brown spots.
- Once done, flip once more, remove from the griddle.
Video
Notes
Nutrition
PLEASE NOTE: Nutritional values are estimated by a computer and may vary based on ingredients and portion sizes. For personalised dietary advice, please consult a qualified healthcare professional.
Cereal Chevdo is a crispy Indian snack mix made with a mix of packaged cereals, nuts and spices. This quick and easy savoury trail mix is mildly spiced, sweet, crunchy and totally addictive. It makes a great tea time snack but is delicious enough to be served on Diwali!
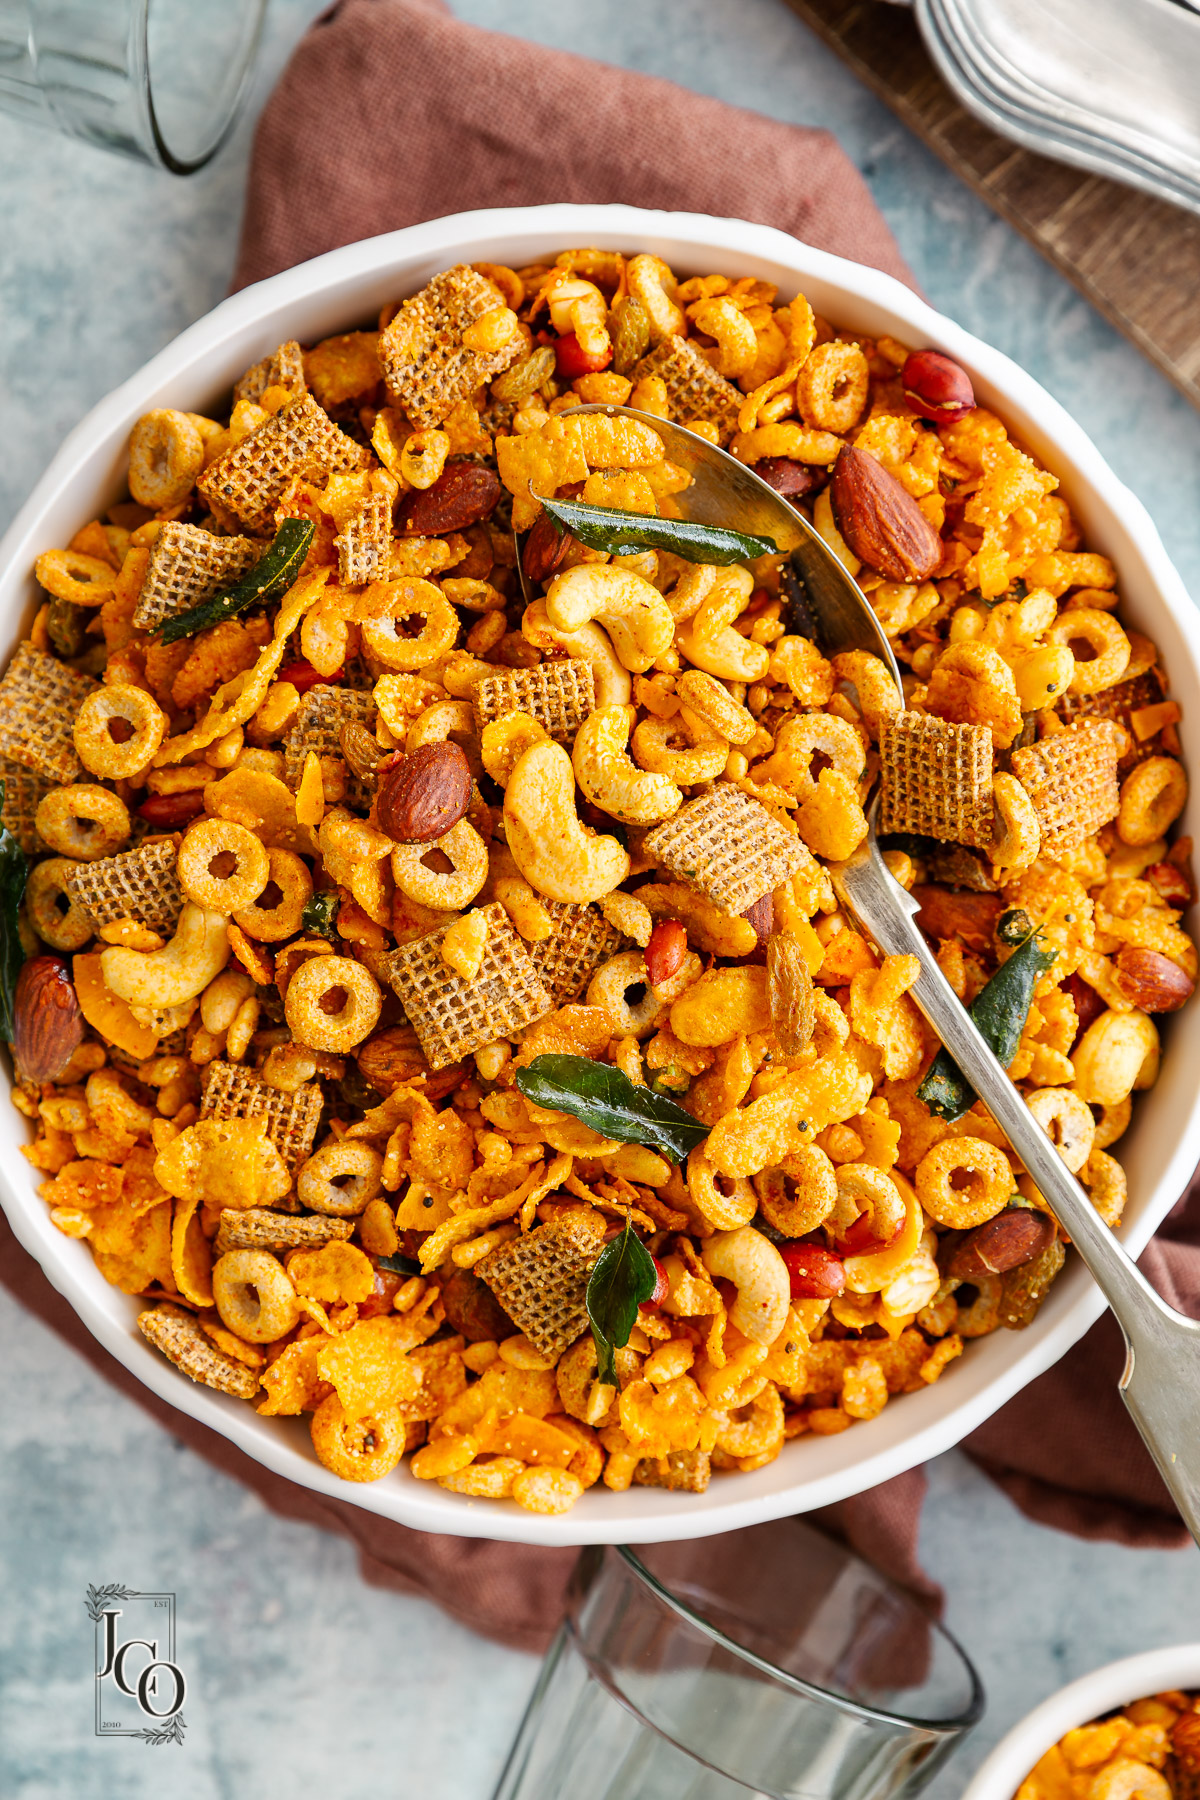
Indian chevdo or chivda, is a popular Indian snack mix made from crispy fried or roasted ingredients such as flattened rice (poha), lentils, nuts, and spices. Variations of ingredients make different types of chevdo such as cornflakes chevdo , kenyan chevdo , farali chevdo or poha chevdo .
Indian cereal chevdo is a bit different because the ingredients are baked rather than fried, using less oil and creating less clean up.
Various types of breakfast cereals are seasoned with basic masala powders such as red chilli powder and whole spices. A little amount of powdered sugar, citric acid is added to enhance the taste. It’s finished with a tempering of aromatic curry leaves and whole spices.
Serve it as it is with a cup of masala chai or pair it with yogurt for a quick breakfast.
Ingredients
Be sure to check out the full recipe and exact ingredient list below in the recipe card.
These cereals are available in the UK under the following names. You can use a mix of whichever cereal you have available. Stick to cereal that is plain rather than flavoured.
- Plain cornflakes
- Cheerios
- Bran flakes
- All bran sticks
- Rice crispies
- Shreddies
- Multi grain start
- Nuts and dried fruit – almonds, cashew nuts and sultanas
- Dried coconut slices or coconut flakes.
Storage
Cereal chevdo can be stored away for at least 2 weeks. It is important to allow the chevdo to fully cool before placing in an airtight container. It can be kept at room temperature.
As always if you make this recipe, be sure to leave me a comment, rate this recipe and tag me on Instagram @jcookingodyssey or #jcookingodyssey. I love seeing all your photos of my recipe recreations!
Don’t forget to follow me on social media using the buttons below – I can’t wait to see you all there!
- YouTube

Cereal Chevdo
Equipment
- Big mixing bowl
- small pan
Ingredients
- 100 grams cornflakes
- 100 grams cheerios
- 100 grams shreddies
- 100 grams rice crispies
- 100 grams bran flakes optional
- 100 grams all bran sticks optional
- 100 grams shredded wheat optional
- 250 grams almonds
- 250 grams cashew nuts
- 250 grams peanuts
- 5 tablespoons dried coconut slices or coconut flakes
- 2 teaspoon red chilli powder
- 3 tablespoon sugar
- 2 tablespoon white poppy seeds optional (Khus Khus)
- ½ teaspoon citric acid limbu na phool
- salt to taste
Vaghar (Tempering)
- 5 tablespoon oil
- 4 large green chillies sliced
- 12 fresh curry leaves
- 6 cloves
- 2 cinnamon sticks
- 1 tablespoon whole coriander seeds
- 1 tablespoon mustard seeds
- ½ teaspoon asafoetida hing
Instructions
- Gently roast almonds, peanuts and cashew nuts in the oven or in a dry pan on the stove for 3-4 minutes.
- Place all the cereals in a large bowl, add raisins and poppy seeds.
- Add roasted nuts and coconut slices.
- Grind sugar and citric acid in a coffee grinder to achieve a fine powder and add three quarters into the cereal.
- Add chilli powder and salt to the cereal and mix very well.
- Heat oil in a small pan, add mustard seeds, hing, cloves and cinnamon and fry for few seconds, then add curry leaves and green chillies and fry till they are crispy. Add coriander seeds and turn off the heat.
- Pour vaghar into the cereal mixture. Gently give it a good mix.
- If the flavouring isn’t sweet enough, then add the remaining ground sugar and citric acid..
- Give another good mix. When the cereal chevdo cools down transfer into an airtight container.
Video
Notes
Nutrition
PLEASE NOTE: Nutritional values are estimated by a computer and may vary based on ingredients and portion sizes. For personalised dietary advice, please consult a qualified healthcare professional.
Note – This recipe has been updated from our recipe archives with a new, improved recipe, new images and content. First published in April 2012.
