Gujarati Khichu is also known as Papdi no Lot or Khichiya papdi lot. This easy and quick snack or side is made with rice flour, green chilies, basic spices and is served hot with peanut oil and pickle masala.
It is naturally vegan and gluten-free.

- What is Khichu
- Ingredients
- Equipment
- How to make Papdi no Lot
- Pro Tips
- Serving Suggestion
- Storage
- Other Gujarati Snacks Recipe
What is Khichu
Khichu or khichi is the Gujarati word for steamed dough.
The dough is usually prepared with rice flour, some spices and coriander. It is used to make Khichi na papad or papdi (poppadoms).
In Gujarat, these papad are made during hot summers, are sun-dried and then stored for whole year. They can be either deep fried in hot oil or roasted directly on the naked flame.
This particular recipe, Chokha Nu Khichu, is prepared with rice flour, however it can be prepared with various flours – see variations below.
Rice flour is stirred in boiling water with green chillies, papad khar and spices. Then, thick soft dough is shaped into doughnuts and steamed. Some people like to steam the dough in the tray or thali in the steamer.
Khichu is served hot with peanut oil (the most popular way), or sprinkled with red masala (methia masala) and cilantro.
Khichu has gained much popularity over time. It is served as a snack, farsan or as a side dish part of Gujarati thali in Indian restaurants. It is popular street food of India too.
This Gujarati steamed dish is enjoyed as much as other steamed dishes like dhokla, muthiya, handvo and khandvi.
Ingredients

Full ingredients with measurements are available in the recipe card below at the end of this post
Rice flour – you will need fine variety of rice flour for this recipe. The fresher the flour is much better as it will effect the taste of this dish.
Green chillies – If you like spicy food use small green thai chillies for this recipe. In Gujarat they are known as lavingya marcha. If your prefer less spicy food use any other green chillies.
Whole spices – cumin seeds and ajwain aka carom seeds for a robust taste.
Sesame seeds – adds a bit of crunch and flavor.
Salt – for the taste.
Baking soda or Papad Khar/kharo to make khichu fluffy and soft.
An authentic gujarati khichu recipe does not contain ginger or garlic.
To be served with :
Peanut oil aka groundnut oil
Red chilli powder/flakes or pickle masala aka methia no masalo
Cilantro / Coriander leaves
Equipment
Pan or saucepan.
Wooden spoon or rolling pin aka velan.
Steamer or instant pot (using the steam function).
How to make Papdi no Lot
Use a ratio of 1 cup rice flour: 2 cup water for a dough that isn’t dry or too sticky.
Pour water into a heavy bottom pan.
Add cumin seeds, chillies, sesame seeds, ajwain, salt and soda.
Bring the water to boil.


Slowly add the rice flour to it. Do not stir the flour, just let the flour absorb the water initially.
After a minute when the water is all absorbed, use a wooden rolling pin to stir the mixture and break up any lumps.
The mixture should be soft and fluffy.
Turn off the heat and allow the mixture to cool slightly.
While the rice flour mixture is cooling, prepare your steamer. Also grease the steaming plate/stand with peanut oil or oil of choice.
Take a small amount of flour mixture, make a small ball and slightly flatten the ball.
Make a small hole in the centre with your thumb or the end of the rolling pin to resemble a doughnut.
Place on the greased tray or stand and steam the flatten rice ball for approximately 15-20 minutes.
You can check for doneness by pushing through a skewer or knife. If it comes out clean the khichu balls are cooked.
Remove them from the steamer.
Garnish with fresh chopped coriander.
Serve with peanut oil, chilli flakes or pickle masala.


Pro Tips
- Ajwain seeds are optional.
- Keep all the ingredients ready before starting to make khichu as you will have to work fast with this recipe.
- You need to make Khichu with a fresh good variety of rice flour, so not use coarse rice flour for it. If your flour is old, you may need more water so add a tablespoon at a time to the rice flour mix.
- Ensure to boil the water sufficiently to allow the flavour from the spices to be extracted.
- Do not immediately mix the flour with the boiling water, allow it to naturally absorb. Once it has, you can then use a wooden spoon or rolling pin to break up any lumps.
- You can skip the steaming method and cook the mixture directly in the pan. You will need to add 1:1.5 flour to water ratio for this. Allow the mixture cook on a very low heat about 15-20 minutes and then shape and serve. You may need to pour in oil to prevent the dough sticking to the pan.
Serving Suggestion
Serve khichu with groundnut oil and methia masala to enjoy it the traditional way.
Why not try this Green Chutney or Gujarati Garlic Chutney for something a bit different.
Storage
You can store leftover papdi no lot in the fridge, simply place in an airtight container and eat within 2 days. Note that it is best eaten fresh.
You can also freeze khichu successfully. Place in freezer safe containers for up to 3 months.
To reheat, I recommend steaming the khichu again in a steamer. You can also place on a microwave safe dish, cover with a wet towel and microwave in short bursts.

Other Gujarati Snacks Recipe
Methi Makai Na Vada
Batata Vada
Dudhi Muthiya
As always if you make this recipe, be sure to leave me a comment, rate this recipe and tag me on Instagram @jcookingodyssey or #jcookingodyssey. I love seeing all your photos of my recipe recreations!
Don’t forget to follow me on social media using the buttons below – I can’t wait to see you all there!
- YouTube

Khichu (Papdi No Lot)
Equipment
- 1 pan
- 1 Rolling Pin or wooden spoon
- 1 Steamer
Ingredients
- 1 ½ cup rice flour
- 3 cup water
- 2 tablespoon green chillies
- 1 tesaspoon cumin seeds
- ¼ teaspoon carom seeds ajwain (optional)
- ¼ teaspoon baking soda
- 1 tesaspoon salt
- 1 tablespoon cilantro coriander
Instructions
- Pour water into a heavy bottom pan.
- Add cumin seeds, chillies, coriander, sesame seeds, ajwain, salt and soda.
- Bring the water to boil.
- Slowly add the rice flour to it. Do not stir the flour, just let the flour absorb the water initially.
- After a minute when the water is all absorbed, use a wooden rolling pin to stir the mixture and break up any lumps.
- The mixture should be soft and fluffy.
- Turn off the heat and allow the mixture to cool slightly.
- While the rice flour mixture is cooling, prepare your steamer. Also grease the steaming plate/stand with peanut oil or oil of choice.
- Take a small amount of flour mixture, make a small ball and slightly flatten the ball.
- Make a small hole in the centre with your thumb or the end of the rolling pin to resemble a doughnut.
- Place on the greased tray or stand and steam the flatten rice ball for approximately 15-20 minutes.
- You can check for doneness by pushing through a skewer or knife. If it comes out clean the khichu balls are cooked.
- Remove them from the steamer.
- Garnish with fresh chopped coriander.
- Serve with peanut oil, chilli flakes or pickle masala.
Video
Notes
Nutrition
PLEASE NOTE: Nutritional values are estimated by a computer and may vary based on ingredients and portion sizes. For personalised dietary advice, please consult a qualified healthcare professional.
Note:- This post was originally posted in September 2012 but I have updated the post since with newer photos and helpful content. The recipe remains the same.
Khichu (Papdi No Lot)
Equipment
- 1 pan
- 1 Rolling Pin or wooden spoon
- 1 Steamer
Ingredients
- 1 ½ cup rice flour
- 3 cup water
- 2 tablespoon green chillies
- 1 tesaspoon cumin seeds
- ¼ teaspoon carom seeds ajwain (optional)
- ¼ teaspoon baking soda
- 1 tesaspoon salt
- 1 tablespoon cilantro coriander
Instructions
- Pour water into a heavy bottom pan.
- Add cumin seeds, chillies, coriander, sesame seeds, ajwain, salt and soda.
- Bring the water to boil.
- Slowly add the rice flour to it. Do not stir the flour, just let the flour absorb the water initially.
- After a minute when the water is all absorbed, use a wooden rolling pin to stir the mixture and break up any lumps.
- The mixture should be soft and fluffy.
- Turn off the heat and allow the mixture to cool slightly.
- While the rice flour mixture is cooling, prepare your steamer. Also grease the steaming plate/stand with peanut oil or oil of choice.
- Take a small amount of flour mixture, make a small ball and slightly flatten the ball.
- Make a small hole in the centre with your thumb or the end of the rolling pin to resemble a doughnut.
- Place on the greased tray or stand and steam the flatten rice ball for approximately 15-20 minutes.
- You can check for doneness by pushing through a skewer or knife. If it comes out clean the khichu balls are cooked.
- Remove them from the steamer.
- Garnish with fresh chopped coriander.
- Serve with peanut oil, chilli flakes or pickle masala.
Video
Notes
Nutrition
PLEASE NOTE: Nutritional values are estimated by a computer and may vary based on ingredients and portion sizes. For personalised dietary advice, please consult a qualified healthcare professional.
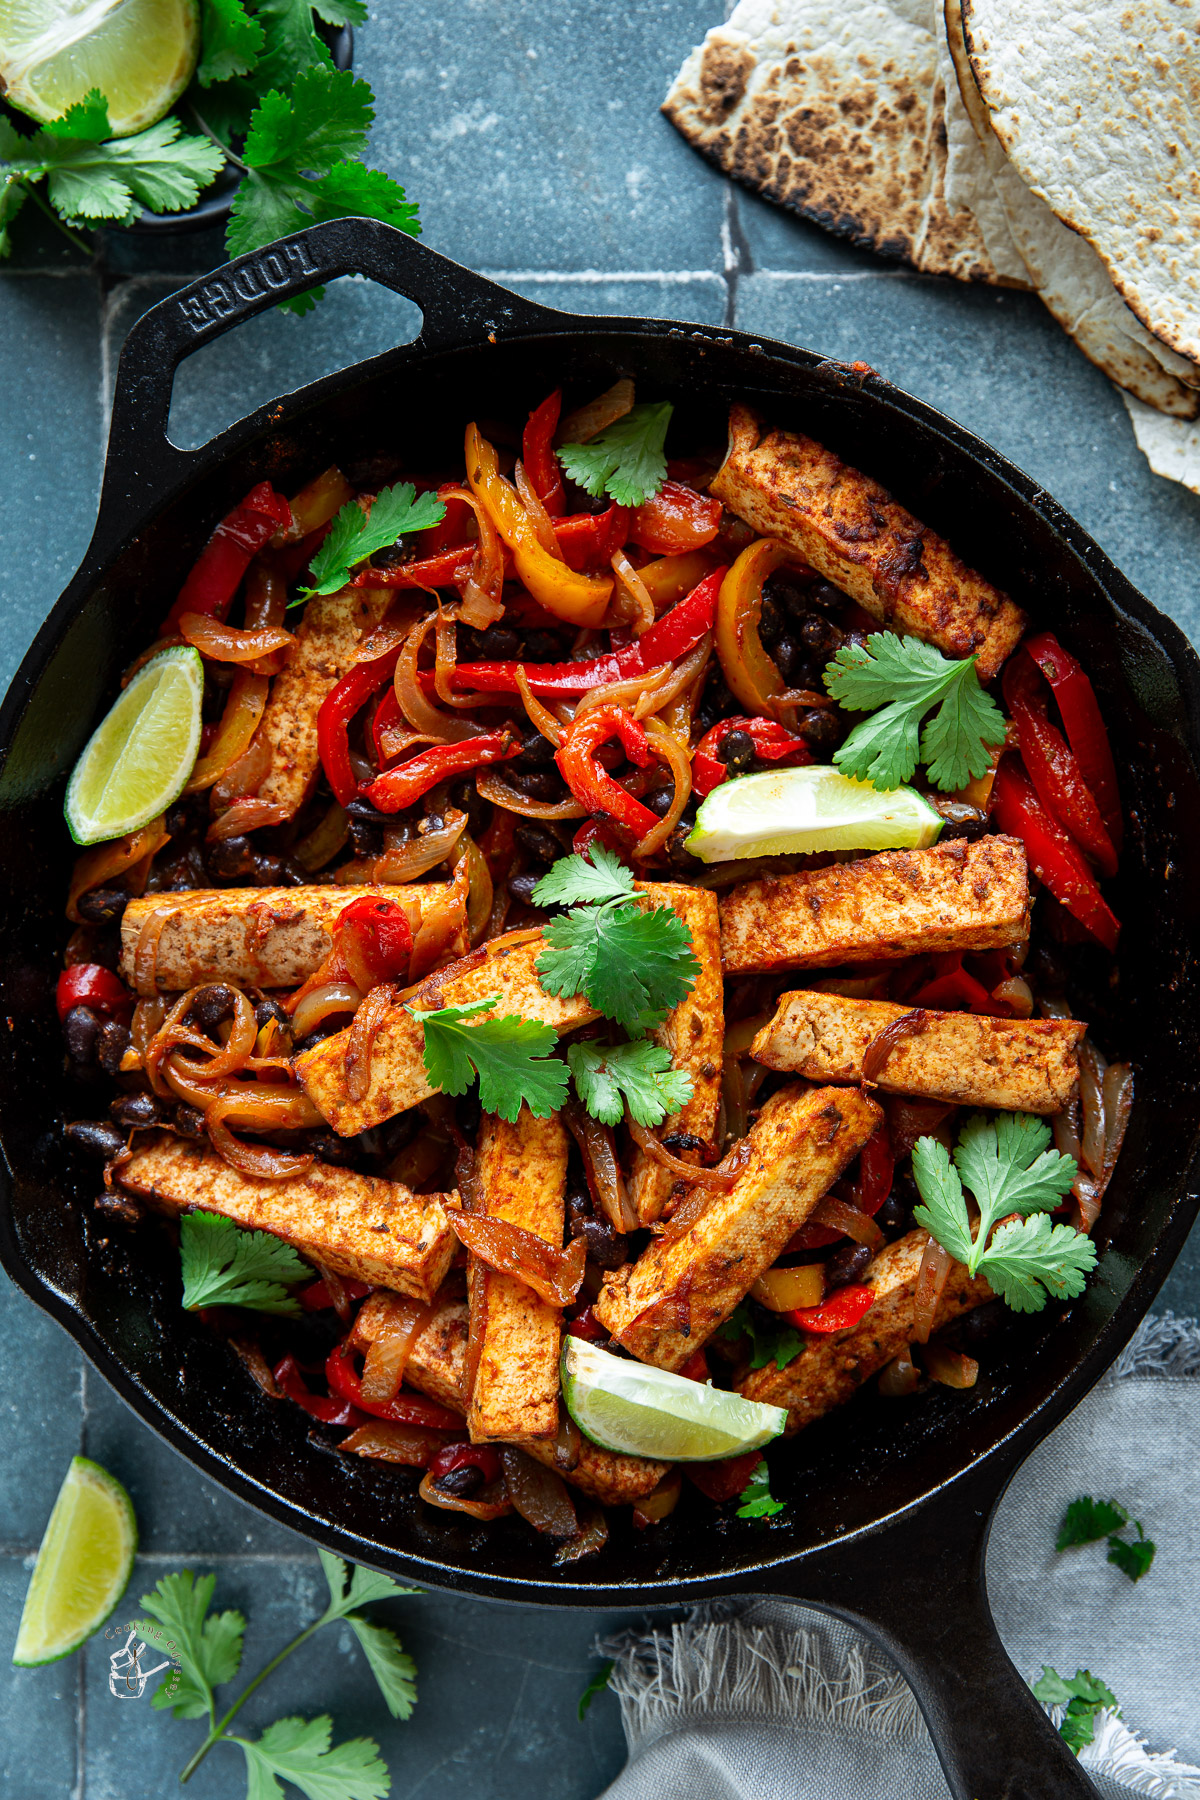
This Vegan Tofu Fajitas recipe is made with crunchy fajita vegetables. Spoon into warm tortillas and serve with your favourite toppings! It is quick and easy to make, great for busy weeknights.
- Ingredients for easy tofu fajitas recipe
- How to make Healthy Tofu Fajitas
- Air Fryer Tofu Fajitas
- Serving Suggestion
- Storage
- Other Tofu Recipes
Tofu fajitas are a flavourful alternative to traditional meat-based fajitas, featuring strips of tofu as the main protein source.
Marinated in a vibrant blend of spices and sautéed with colourful bell peppers and onions, tofu fajitas offer a delicious plant-based option!
The tofu provides great texture and the fajita seasoning has great flavour.
Ingredients for easy tofu fajitas recipe
Full ingredients with measurements are available in the recipe card below at the end of this post
Tofu – extra firm tofu block.
Peppers – I have used red and yellow bell peppers. If you wish add green bell peppers, sometimes I also add bright orange bell pepper too.
Onion – white onion or red onion.
Black beans – you may use refried beans also
Seasoning – I have used homemade Fajita seasoning which contains mix chili powder, onion powder, garlic powder, black pepper, cayenne pepper. ground cumin.
You can use store-bought taco seasoning for convenience. A dash of chipotle powder would work too.
Oil – use olive oil, vegetable oil or avocado oil to cook the fajita veggies.
Tomato puree – or soy sauce or hot sauce
Fresh cilantro
Lime juice
Equipment
Tofu press or drain the tofu using paper towels and a heavy object.
Large skillet (cast iron pan) or baking sheet if making vegan sheet pan fajitas.

How to make Healthy Tofu Fajitas
Slice the onions and peppers into thin strips. Slice the drained extra-firm tofu into thick strips.
Heat a skillet on medium-high heat and add a little bit of oil.
Tip in the sliced onions and peppers and sauté until just softening.


Add the fajita seasoning, black beans and crushed tomatoes, salt to taste and mix well.
Add the tofu strips and gently stir and allow the mix to cook until the tofu.
A top tip is to add the tofu slices after mixing the spices so that you do not break the tofu. Make sure the tofu touches the pan so that it can become golden brown crispy tofu.
Another option is to first pan-fry the tofu, remove, cook the veggies and then tip the tofu back into the pan.

Air Fryer Tofu Fajitas
The air fryer is a great way to cook this filling.
In a large bowl, gently mix together the fajita veggies, black beans, seasoning, crushed tomatoes and oil.
Place drained and sliced tofu first into the preheat air fryer basket, and air fry for 3-4 minutes on 200C / 400 F.
Once the tofu has browned a little, tip in the rest of the ingredients and air fry for 5 minutes.
It doesn’t matter too much if everything isn’t in a single layer as long as the basket isn’t over filled.
Serving Suggestion
For an easy vegan dinner, serve up your tofu fajita filling with flavourful toppings that the whole family will love.
Flour or corn tortillas work well.
Mango Pico de Gallo or Mango Avocado Salsa or guacamole
Creamy Cilantro Sauce – you can easily make this recipe vegan friendly or use vegan sour cream
Vegan Cheese
Squeeze over fresh lime juice
Serve with a side of mexican rice (external link)
Storage
Store leftovers in an airtight container and keep in the fridge for up to 3 days.
Do not freeze the veggies.

Other Tofu Recipes
Air Fryer Tofu
Tofu Mango Curry
Tawa Burger
As always if you make this recipe, be sure to leave me a comment, rate this recipe and tag me on Instagram @jcookingodyssey or #jcookingodyssey. I love seeing all your photos of my recipe recreations!
Don’t forget to follow me on social media using the buttons below – I can’t wait to see you all there!
- YouTube

Tofu Fajitas
Equipment
- 1 Skillet
- 1 Spatula
Ingredients
- 2 cup tofu firm (400 grams), drained and cut into strips
- 1 cup onion sliced
- 2 cup peppers sliced (red and yellow)
- 1 cup black beans
- 3 tablespoon fajita seasoning store bought or homemade
- 3 tablespoon oil
- ¼ cup tomato puree crushed tomatoes
- 2 tablespoon lime juice
- 2 tablespoon cilantro
- salt to taste
Instructions
- Slice the onions and peppers into thin strips. Slice the drained extra-firm tofu into thick strips.
- Heat a skillet on medium-high heat and add oil.
- Tip in the sliced onions and peppers and saute until just softening.
- Add the fajita seasoning, black beans and crushed tomatoes and salt and mix well.
- Add the tofu strips and gently stir and allow the mix to cook until the tofu.
- A top tip is to add the tofu slices after mixing the spices so that you do not break the tofu. Make sure the tofu touches the pan so that it can become golden brown crispy tofu.
- Another option is to first pan-fry the tofu, remove, cook the veggies and then tip the tofu back into the pan.
- Sprinkle lime juice and fresh cilantro.
- Serve up your tofu fajita filling with warm tortillas and flavorful toppings that the whole family will love.
Video
Notes
Nutrition
PLEASE NOTE: Nutritional values are estimated by a computer and may vary based on ingredients and portion sizes. For personalised dietary advice, please consult a qualified healthcare professional.
