This raw onion chutney recipe is the same as the red cold onion chutney served in British Indian restaurants with poppadoms . It is a super easy chutney recipe as no cooking is required and can be ready within minutes.

Recreate takeaway style Indian onion relish that is served with poppadums as a starter in BIR or curry houses!
There are many different names for this chutney but they all refer to the same recipe: Indian onion chutney, Indian red Onion chutney, raw onion chutney, cold onion chutney, spiced onions, Indian onion relish for poppadoms, to name a few.
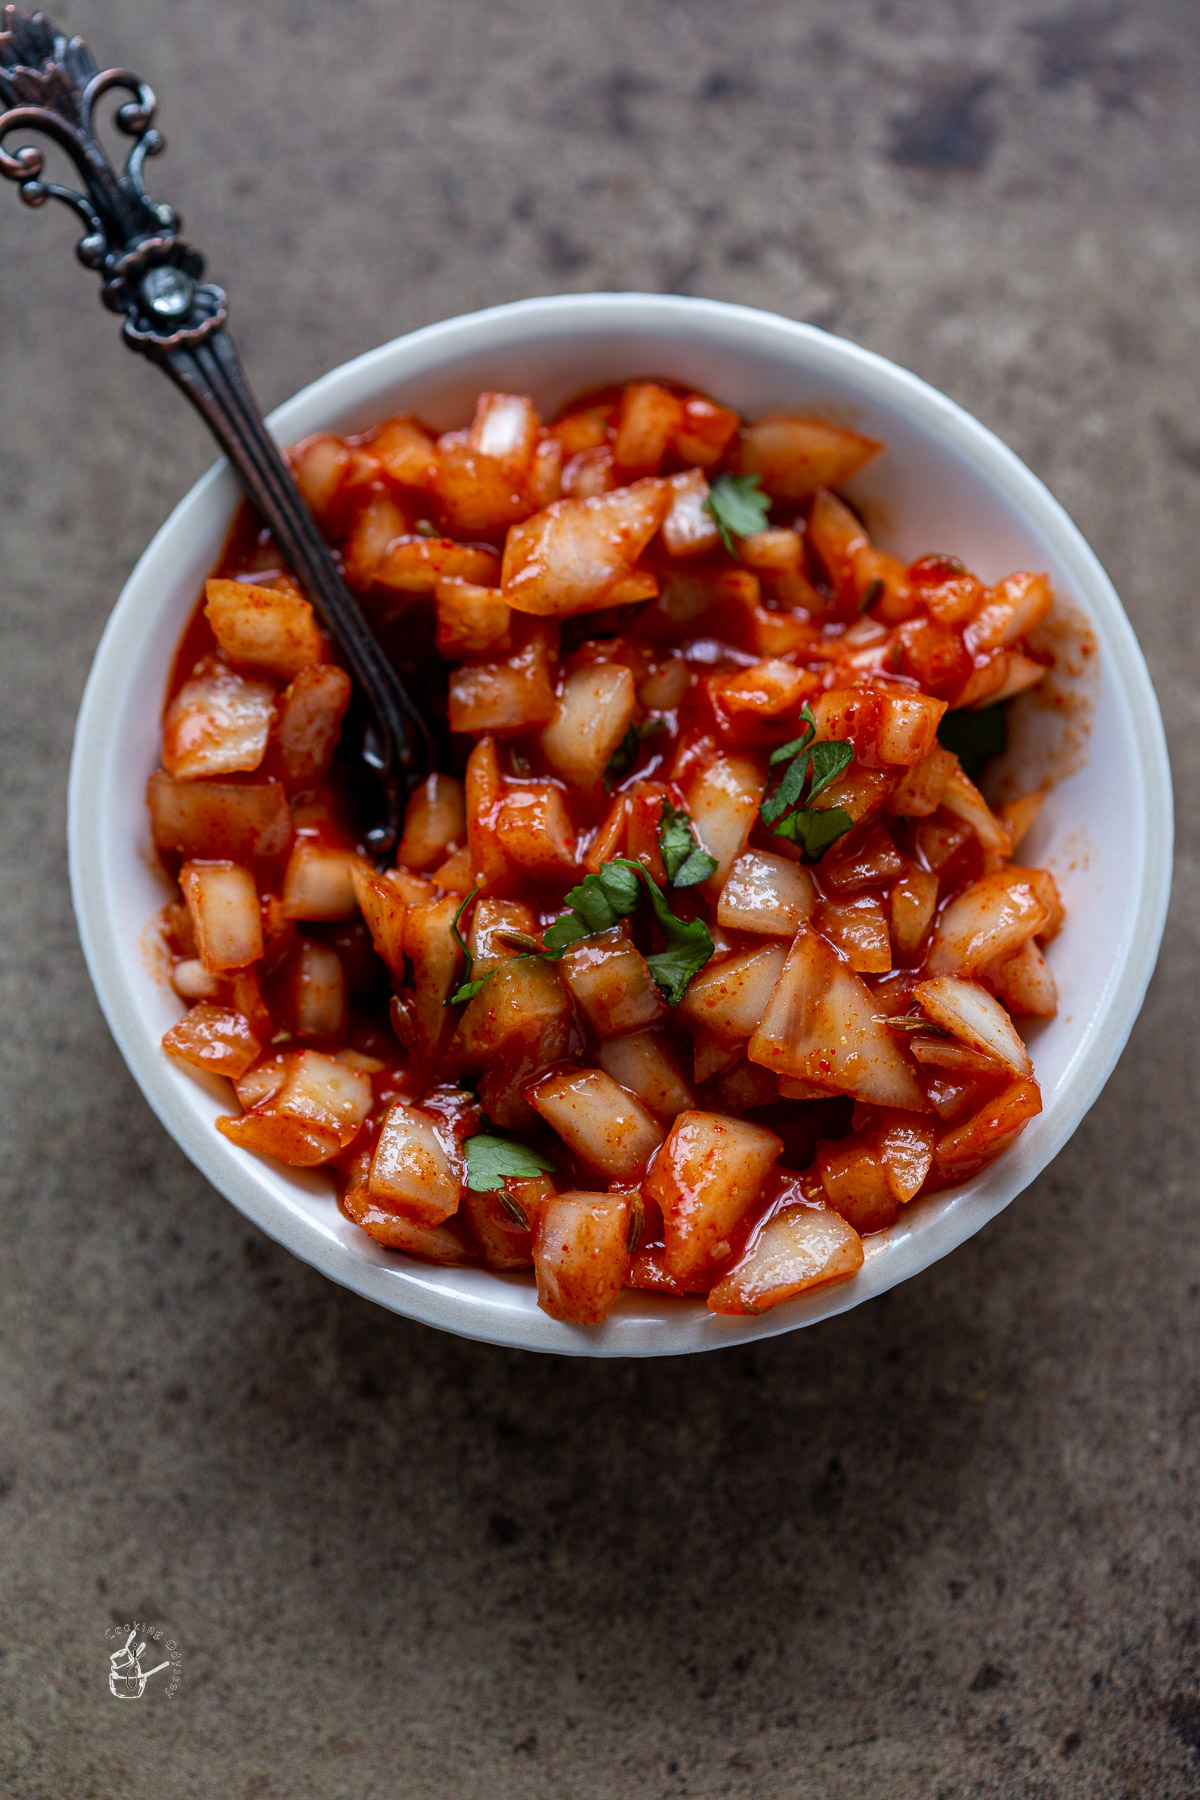
This easy onion chutney usually has a bright red color and sharp taste thanks to the spicy ketchup mixture that raw diced onions are mixed in with. The recipe is really that simple!
It is a great alternate side to Indian Onion Salad which is a simple recipe of raw onions that are flavoured with lemon juice, fresh coriander and various spices.
I love tangy chutneys alongside my crispy fried poppadoms and Indian appetizers. The classic trio of poppadom dips /chutneys include Indian mint sauce (sometimes mint raita), mango chutney and an Indian style salad of either onions or kachumber .
Have you tried this finger licking Indian Tamarind Sauce ? It is perfect vegan dipping sauce to serve with your Indian snacks or Indian starters.
These Samosa Sauces recipes are guaranteed to elevate your samosa snacking experience!
South Indian Onion Chutney (Vengaya Chutney recipe)
It is worth noting that there is a variation to onion chutney recipes and this is the version served in South Indian cuisine known as Vengaya chutney in Tamil language.
It is made with regular onions, garlic cloves and dry red chillies which is cooked then ground to a smooth paste. In this particular version, the onion mixture is tempered in mustard seeds, curry leaves, urad dal (black gram) and chana dal (split bengal gram). It is sweetened with tamarind and jaggery.
South Indian chutneys are usually served as a side dish alongside hot idli dosa, neer dosa and medu vada – a staple in South Indian homes.
You can also find coconut chutney and tomato onion chutney served with South Indian food.
Why you should make this recipe:
Naturall y vegan and gluten-free
No-cook chutney recipe
Easy Indian onion chutney recipe
Can be ready within 5 minutes
Recreate Indian restaurant flavours at home
Ingredients for Indian Onion Chutney/Spicy Onions:
Full ingredients with measurements can be found in the recipe card below.
Onion – this is the main ingredient and you can use either white onions or red onions for this recipe. Dice the onion as finely as possible.
If you find raw onions too strong, you can soak the diced onions in cold water for around 15-20 mins.
Alternatively, pearl onions have a sweeter and more mellow flavour but are probably more difficult to get hold of.
For the red sauce:
Tomato ketchup – and/or you can use tomato paste to give a more vibrant red colour
Red chili powder – you can alternatively use paprika. Add this according to your spice preference.
Cumin seeds – you can either use cumin seeds or cumin powder. If you have the time, you can optionally lightly toast cumin seeds in a pan on medium heat for 1 minute to extract the flavour better.
Lemon juice – use either bottled or fresh lemon or lime juice to provide a slight tart flavor
Salt – a pinch to taste
Variations
You can add a pinch of sugar to the red tomato sauce mixture which will mellow down some of the tartness from the tomatoes
Why not mix in a little mango chutney in with the ketchup to make an Indian onion dip for your poppadoms.
Add a tiny pinch of Madras curry powder .
How to make:
Full printable recipe in recipe card below.
Follow the step by step pictures for Indian onion chutney that is ready in 5 minutes!
Dice your onions finely – use a sharp knife for this step.

The next step is optional. If you are pressed for time, you can leave out this step.
Place the raw onions in a bowl of cold water with ice- this reduces the pungency of the onions whilst keeping them crunchy.

Meanwhile, mix tomato puree/tomato ketchup, chilli powder and cumin powder together in a bowl. Add lemon juice.


Drain the onions after 15 mins and ensure you pat dry with a clean kitchen towel to remove the excess moisture.
Mix the onions in the tomato mixture and add salt to taste. Note that ketchup is usually salty so you may not need to add it.

You can now keep this cold onion chutney in the fridge until serving time.
I like to serve the dip at room temperature but many like to serve it chilled. Do whatever you fancy!

Serving Suggestions
Serve Indian Onion Chutney the original way with mango chutney and indian yogurt mint sauce alongside a basket of poppadoms. Why not add a side of cucumber raita ?
You can also enjoy this cold onion chutney in different ways with pakora , samosas and other Indian finger foods.
I like Indian style spicy onions with my curries too! A feast with Peshwari Naan , Punjabi Matar Paneer , Indian Vegetable Curry and delicious onion chutney cannot be missed!
How about Restaurant style Brinjal Bhaji and Chana Saag along with Tarka Dal – it’s healthy and delicious!
I find that this Indian onion relish is best served fresh so I prefer to make a small batch every time I want to serve it.
Storage
You can store leftover chutney in an airtight container for up to 2 days. I would consume the chutney by the next day as the flavours get quite strong and the onion becomes quite pungent as it sits.
If you have leftovers that you do not want to eat, you can add it into your curry when preparing the onion/garlic base.
Onion chutney served at Indian restaurants is made from finely chopped onions, tomato ketchup, red chilli powder, cumin and lemon juice. It is served with poppadoms and Indian starters.
Spiced onions keep well in the fridge for up to 2 days.

Other Chutney Recipes
Garlic Chutney – Gujarati Lasan ni Chutney
Date Tamarind Chutney – Imli chutney
Mint and Coriander Chutney
Red Garlic Chutney for Chaat
Apple Saffron Chutney
Carrot Tomato Cardamom Chutney
Apricot Thyme Chutney
Red Pepper & Chilli Chutney
As always if you make this recipe, be sure to leave me a comment, rate this recipe and tag me on Instagram @jcookingodyssey or #jcookingodyssey. I love seeing all your photos of my recipe recreations!
Don’t forget to follow me on social media using the buttons below – I can’t wait to see you all there!
- YouTube

Indian Onion Chutney (for poppadoms)
Equipment
- 1 Chopping board
- 1 Sharp knife
Ingredients
- 1 big onion diced
- 4 tablespoon tomato ketchup add more or less
- 1 teaspoon red chili powder
- 1 teaspoon cumin seeds
- 1 teaspoon ground cumin optional
- 1 teaspoon lemon juice
- salt to taste
Instructions
- First peel the onion and dice it finely. 1 big onion
- If you have time soak diced onion in a bowl of cold water with ice.
- Meanwhile, mix tomato puree/tomato ketchup, chilli powder and cumin powder together in a bowl. Add lemon juice. 4 tablespoon tomato ketchup, 1 teaspoon red chili powder, 1 teaspoon cumin seeds, 1 teaspoon ground cumin, 1 teaspoon lemon juice
- Drain the onions after 15 mins and ensure you pat dry with a clean kitchen towel to remove the excess moisture.
- Mix the onions in the tomato mixture and add salt to taste. Note that ketchup is usually salty so you may not need to add it. salt
- You can now keep this cold onion chutney in the fridge until serving time.
Video
Notes
Nutrition
PLEASE NOTE: Nutritional values are estimated by a computer and may vary based on ingredients and portion sizes. For personalised dietary advice, please consult a qualified healthcare professional.
Tawa pulao is a popular Indian street food, and is also known as Pav Bhaji Pulao. In this Mumbai style tawa pulao, cooked rice and vegetables are stir fried in butter, pav bhaji masala and with other spices and herbs. This easy recipe can be made quickly using leftover rice.

- Tawa Pulao
- Ingredients
- Tips
- Notes & Suggestions
- How to make homemade tawa pulao
- Serving Suggestions
Tawa pulao or tava pulao is a delicious pulao recipe that is spicy, tangy and packed with veggies, a flavourful and popular street food from the city of Mumbai, India.
This street style tawa pulao is made with pre cooked rice, colourful vegetables, butter, pav bhaji masala.
To enhances the flavours and bright colour of the pulao, red chilli garlic paste made with kashmiri chillies added to the rice.
Rice is a staple ingredient in Indian cooking. In many households, rice is cooked almost every day. Plain or Jeera Rice (made with cumin seeds) can be enjoyed with curries or dal .
Desserts made with rice such as Kheer are made at any day of the week. We love to cook savoury rice dishes such as vegetable pulao , rice pilaf, biryani and one of them is Tawa Pulao.
It is packed with flavours and textures that are quintessential to Indian cooking.
Some people prepare tawa pulao by mixing leftover pavbhaji and leftover rice.
Tawa Pulao
The name Tawa Pulao comes from the big tawa (flat, concave pan) that the rice dish is cooked in.
In streets of Mumbai, you’ll find street vendors preparing and selling tawa pulao rice on the local pav bhaji counters along with other delicious street food such tawa paneer masala and masala pav.
Home cooks like us don’t need huge tawa to cook Tawa pulao, this recipe can be made easily in any frying pan or wok.
Tawa pulao recipe has a very unique spicy flavour and the secret ingredient to achieving this you must need Pav bhaji masala.
Pav bhaji masala is also used in making very typical popular street food Pav Bhaji recipe and Tawa Burger . Rich flavors of the pav bhaji masala enhances the tastes of the tawa pulao recipe.

Ingredients
Measurements in the recipe card below.
Rice – for tawa pulao we need white rice. We love to use good quality Sella Basmati Rice, which I have used in making my veg biryani .
Vegetables – I have used carrots, green peas, onion, green bell pepper, potatoes, fresh tomatoes and cauliflower. You can use other vegetables like cabbage, french beans and sweetcorn too.
Pav Bhaji Masala – for flavourful and good tawa pulao, good quality pav bhaji masala is must. Pav bhaji masala is a spice powder made with basic whole spices, that is used to flavour the dish.
Use either homemade pav bhaji masala or your favourite shop bought brand masala. We like to use Everest brand pav bhaji masala in our cooking.
Butter – to achieve the same flavours and taste as Mumbai tawa pulao, loads of butter is necessary, you can use salted or unsalted butter.
Flavours, Seasoning and Garnishing – for best results, we also using turmeric powder, red chilli powder.
Ginger-garlic paste, kasuri methi (dried fenugreek leaves), lemon juice and fresh coriander leaves ( hara dhaniya)
Red chili paste prepared with soaked kashmiri chillies or fresh red chilies and garlic pods. Must for tawa pulao recipe.

Tips
For best tawa pulao recipe to make at home, here are some tips and tricks which will help.
Use the right rice – Tawa pulao is an Indian rice dish thus use Basmati rice. For great looking and tasty pulao, I prefer long grain rice. We like to use Sella Basmati Rice, which makes excellent pulao rice.
Sella basmati rice is long and upon cooking the rice grains length doubles. Also, it does not stick together and break. It is perfect for cooking Biryani, Zarda & Pulao in large quantities.
We find sella basmati rice in Indian or Pakistani grocery stores.
Do Not Over Cook Rice – For best results and nice looking pulao or biryani dish, ensure not to overcook your rice. You don’t need mushy or clumped rice for this dish.
I personaly avoid using pressure cooker or instant pot. It is best to use an open pot to cook the rice. This way you can see how your rice is cooking, rice will cook perfectly, all grains are separated.
A tip from my Mum for best rice is to add a few drops of oil and lemon juice to make fluffy rice.
By mistake if you have added extra water to cook the rice, cook rice until al dente. Drain the water from the rice using a colander and let the excess water drain away.
Let the rice cool completely before adding it to the sauteed veggies. If I want to make stir fry rice, I cook my rice few hours before, cool completely and store it in the fridge.
For the best flavours do not skip butter in this recipe.
Finish it with lemon juice and kasoori methi.
Notes & Suggestions
Add Beans – If you want to add cooked chickpeas or red kidney beans, pan fried paneer or tofu. Add the beans with vegetables when cooking.
Add more vegetables – for my tawa pulao I have used potato, capsicum, carrots, green peas, tomato, cabbage and cauliflower.
You can add other vegetables such as green beans, broccoli, sweetcorn, cooked beetroots (colour will change). Don’t want double carb in your dish? Skip potatoes.
Instant Chili Garlic Paste – Don’t have dried chillies on hand or do not have time to soak ,do not panic. Simply take Kashmiri or any other chili powder and blend with garlic cloves/powder or granules with little water.
Adjust spices – usually tawa pulao recipe is spicy, however spice levels can adjust according to your taste. Do not need to add all the chili-garlic paste or green chili in this recipe. But if you like spicy food, add more 🙂

How to make homemade tawa pulao
First step – make chili-garlic paste and cook fresh rice
Take 6-8 whole dried red kashmiri chilies, add in the bowl. Pour hot water and cover it with the lid. Let it soak for 20-30 minutes until they are soften.
Do not use any other regular dried chillies, as you won’t achieve a bright red colour paste.
Meanwhile take 1 cup of basmati rice (roughly 185-210 grams) in a bowl. I have used sella basmati rice. Rinse the rice under clear running water until water turns clear.
Add enough water to cover the rice and soak it for at least 20 minutes. Make sure you use cold water to soak the rice.


Once 20 minutes are up or rice is soaked properly drain the water from the rice. Add 5-6 cups of water in a pan/pot, also add a few drops of oil, lemon juice and pich of salt.
Bring it to a boil on medium heat, once water comes to a roaring boil point add soaked rice that is well drained.


Do not cover the pan whist rice is cooking and let the rice cook until al dente or just cooked or 95%. The cooking time depends on the quality and the quantity of the rice.
For the Sella rice I used it too around 5-6 minutes. Turn off the heat.


Drain the water from the cooked rice using a strainer (small holes). Let it cool for a couple of minutes, and fluff up the rice using a fork.
Allow the rice to cool down completely before adding it to the pulao.
Roughly from 1 cup uncooked basmati rice, you’ll get 2 1/2 – 3 cups of cooked rice.


Whilst rice is cooling make chili-garlic paste, drain the water from the red kashmiri chilies which were soaking. If you prefer less spicy pulao, cut open the chilies and remove the seeds.
Add soaked and drained chilies along with little water (3-4 tablespoon) and 6-8 garlic cloves in a blender jar.
Do not add much water as we need thick paste. Blend or pulse until you have thick and smooth paste. Leave it aside.


- Second step – Prepare all your veggies
You will need
potato boiled, peeled and cut
carrots – steamed
green peas – steamed
cauliflower – steamed
bell peppers (green) chopped
fresh tomato (chopped)
onion (peeled and chopped)
cabbage
1 green chili finely chopped (optional)
- Third step – Make Tawa Pulao
Add 3 tablespoons of butter and 2 tablespoons of oil (optional) in a frying pan, wok or large tawa if you have one. Heat butter and oil, then add cumin seeds. Let the seeds crackle.


Keep the heat to medium-low and add finely chopped one medium onion and cook for 2-3 minutes until raw aroma goes away or onion turns translucent.
Add 2 tsp ginger garlic paste and green chili (optional), cook with onions for minute or so. Now add 1 tablespoon of prepared chili-garlic paste (you may add 1-2 teaspoon more if you like spicy food).
Cook the mixture for 1 minute more.


Now, add all the prepared vegetables and some salt (if using salted butter, don’t add too much salt). Stir all the vegetables until well combined and cook for 1 minutes.


Add 1/2 teaspoon of turmeric powder and 2 tablespoons of pav bhaji masala. You may also add a small amount of red chili powder.
Stir everything and sprinkle a tablespoon of water, so masala doesn’t burn. Cook everything 1 minutes, the vegetables should not be over cooked or mushy.


Add cooked and cooled rice to the veggies and give it a good mix until everything comes together.
At the end of cooking, add kasoori methi, fresh cilantro leaves and lemon juice.
Mix gently, then your mumbai streets style tawa pulao is ready to enjoy!


Serving Suggestions
Being a tawa pulao spicy dish, it should be served with cooling yogurt dishes such as onion raita or boondi raita.
You can also add a tablespoon of butter on top before serving, will add more flavor to the pulao!
Sometimes I love to serve with mixed fruit raita , roasted tomato raita and refreshing Indian side salad Kachumber . I also wash it down with mango lassi or rose lassi .
Storage

Other Indian Street Food Recipes
Bread Pakora with stuffing (Bread Bajji)
Batata Vada
Bhel Puri
Khaman/Dhokla Chaat
Dabeli
As always if you make this recipe, be sure to leave me a comment, rate this recipe and tag me on Instagram @jcookingodyssey or #jcookingodyssey. I love seeing all your photos of my recipe recreations!
Don’t forget to follow me on social media using the buttons below – I can’t wait to see you all there!
- YouTube

Tawa Pulao Recipe
Equipment
- 1 Frying pan or wok
- 1 Spatula
- 1 Chopping board
- 1 Sharp knife
Ingredients
Rice
- 1 cup rice sella basmati
- 5 cup water
Chili Garlic Paste
- 6 red chilies dry kashmiri
- 6 cloves garlic
Other Ingredients for Tawa Pulao
- ¼ cup butter
- 2 tablespoon oil
- 1 teaspoon cumin seeds
- 1 big onion cut
- 1 teaspoon ginger puree
- 1 teaspoon garlic puree
- ½ cup bell pepper green capsicum
- ¾ cup tomato cut
- 1 cup mix vegetables steamed – carrots,green peas, cauliflower
- 1 cup potato boiled, peeled and cut
- ¼ cup cabbage cut
- 2 tablespoon pav bhaji masala
- 1 teaspoon chili powder kashmiri – optional
- ½ teaspoon turmeric powder
- salt to taste
- 1 teaspoon dried fenugreek leaves kasoori methi
- 2 tablespoon lemon juice
Topping/Garnish
- 3 tablespoon coriander/cilantro chopped
- 2 wedges lemon optional
Instructions
Chili Garlic Paste and Soak Rice
- First make chili garlic paste. Soak dried chilies in hot boiling water in a bowl for at least 30 minutes. 6 red chilies
- Rinse the rice in clear running water until waterturns clear. Soak washed rice in a bowl with cold tap water at least 20-25 minutes. 1 cup rice
- Once chillies are soaked and hydrated, drain the water. Remove stem and add in the blender jar with garlic cloves. If you want less spicy paste, remove the seeds from the chili. 6 cloves garlic
- Add very little water (2 tablespoon max) and blend until you have smooth thick paste. Leave it aside.
Cook Rice
- In a big pot or pan add water, add a tiny pinch of salt and few drops og oil. 5 cup water
- Bring it to roaring boil, drain the water from the soaked rice.
- Add soaked rice into the boiling water.
- Keep heat on high. Do not cover the pan at all whilst rice is cooking.
- Cook rice until 95% done, rememeber not overcook the rice.
- Drain the water from the rice using a strainer. Leave it aside to cool at room temeprature.
- After a couple of minutes spread it in the big plate/tray to cool completely in less time.
Cook Tawa Rice
- In a frying pan, wok or large tawa add butter and oil on medium flame. 1/4 cup butter, 2 tablespoon oil
- Let the butter melt, then add cumin seeds. 1 teaspoon cumin seeds
- Once cumin seeds splutter, add onion slices to it. 1 big onion
- Fry the onions until light pink and translucents on mefium-high heat. It will take approximate 2 minutes or less.
- Then add ginger-garlic puree and chili garlic paste according to your taste that you have prepared using soaked chillies. (Do not add all the chili garlic paste) I added 1 tablespoon and it was spicy enough for us. 1 teaspoon ginger, 1 teaspoon garlic
- Cook the paste and onion mixture for 1 minute or so.
- Now add chopped tomatoes and capsicum, mix well and cook for 1 minute. 1/2 cup bell pepper, 3/4 cup tomato
- Add remaining vegetables, stir and cook for 2 minutes on medium-high heat. 1 cup mix vegetables, 1 cup potato, 1/4 cup cabbage
- Tip in pav bhaji masala, chili powder and turmeric powder and mix everything and cook everything further for 1 minute. 2 tablespoon pav bhaji masala, 1 teaspoon chili powder, 1/2 teaspoon turmeric powder
- Add prepared rice and salt (it will be around 3 cups cooked rice) and mix with spices and vegetables. Mix gently on medium heat. salt
- Sprinkle crushed kasoori methi, coriander and lemon juice and mix well. 1 teaspoon dried fenugreek leaves, 2 tablespoon lemon juice, 3 tablespoon coriander/cilantro
- Serve tawa pulao hot with (tablespoon butter on top) lemon wedges, cooling raita and fresh kachumber salad. 2 wedges lemon
Video
Notes
Nutrition
PLEASE NOTE: Nutritional values are estimated by a computer and may vary based on ingredients and portion sizes. For personalised dietary advice, please consult a qualified healthcare professional.
Note – this recipe was posted on our blog on 10th March 2012, since I have updated the post with new content and pictures.
